Right to Repair & EmpCo: Claims and Repairability - Configuration
Every setting per sales channel – cut-off dates, warranty periods, modules, product page blocks and snippets.
Here is every setting, explained in plain language – with the default value and what it actually does.
The two places settings live
1. The extension configuration under Extensions → My extensions → Repair & Consumer Info Compliance → Configuration. This is where you control how the extension behaves. Everything here can be set per sales channel – pick the channel at the top of the page.
2. The module settings under Orders → Claims → Settings. This is where you maintain the warranty duration per country and the manufacturer defaults. These apply across all sales channels.
Set your general defaults first, then adjust individual sales channels where they need to differ.
General
| Setting | Default | What it does |
|---|---|---|
| Enabled | off | Switches the whole extension on for the selected sales channel. This is your first setup step – turn it on, then adjust the sections below. |
Modules
This is where you decide which parts of the extension are active.
| Setting | Default | What it does |
|---|---|---|
| Claims workflow active | on | Switches on the claims workflow: the claims area in the customer account and the workflow steps in the admin. |
| Product page info active | on | Switches on the pre-contractual info on the product page (repairability score, warranty notice, spare parts and repair links). |
| Send notification emails | on | Sends automatic emails to your customer on the workflow steps. Switch it off if you communicate outside the shop. |
| Pre-mark new claims as eligible | off | Marks every newly logged claim as covered by the obligations right away. Off means eligibility is decided in the workflow. Only matters for orders placed before the cut-off date – after it, claims are eligible anyway. |
| Reminder for open claims (days) | 14 | A daily task flags claims that have been sitting in Reported for this many days without a notice being given. 0 switches the reminder off. |
| Email address for reminders | empty | Gets an email about overdue claims on top of the admin notification. Leave empty for no email. |
| Reply-to address for customer emails | empty | Customer replies to the claim emails go to this address instead of your shop default. Applies to all customer emails and to the merchant reminder email. Leave empty for the shop default. |
| Retention for closed claims (months) | 0 | Automatically deletes closed claims including their activity log after this many months (GDPR storage limitation). 0 = nothing is deleted. |
Claims workflow (right to repair, from 31 July 2026)
| Setting | Default | What it does |
|---|---|---|
| Cut-off date for claims obligations | 2026-07-31 | The obligations (notice about the right to choose, +12 months warranty after a repair) apply only to orders placed on or after this date. |
| Base warranty duration (months) | 24 | The statutory warranty duration in the target country of this sales channel. It's the basis for every deadline calculation. Country-specific differences go in Settings (see below). |
| Warranty extension after repair (months) | 12 | The one-time extension added to the base warranty after a completed repair. The statutory standard is 12 months; 0 switches the extension off. |
The cut-off dates that ship with the extension are defaults. National implementations of the directives may differ – check what applies in your market and adjust the dates per sales channel.
Product page info (EmpCo, from 27 September 2026)
| Setting | Default | What it does |
|---|---|---|
| Cut-off date for product page obligations | 2026-09-27 | From this date the product page info is shown in your shop. |
| Show repairability block on product page | on | Shows the info block on the product page – but only for products that actually have data. |
| Show "manufacturer repair obligation" badge | off | An optional badge for certain product groups. Deliberately off by default, because advertising something that is legally required anyway can get you into trouble. |
Product page blocks
These switches decide which individual elements appear inside the product page block. Every element only shows up if the product actually has that data.
| Setting | Default | What it does |
|---|---|---|
| Show repairability score | on | Shows the score (for example "7 out of 10"), if maintained. |
| Show warranty notice | on | Shows the notice about the statutory warranty. |
| Show repairability label image | on | Shows the label image you stored, if any. |
| Show spare-parts availability | on | Shows your spare-parts information, if maintained. |
| Show link to repair information | on | Shows the link to the manufacturer's repair page. |
| Maximum of the repairability scale | 10 | The reference for "… out of X". Only kicks in when the product itself has no scale of its own. |
The optional disclaimer below the block is maintained through the snippet
vioveRepairCompliance.detail.disclaimer (empty = no notice) – see
Editing the customer-facing texts below.
Badge
Controls how the optional badge looks.
| Setting | Default | What it does |
|---|---|---|
| Badge colour | #189eff | The background colour of the badge as a hex value. An invalid value falls back to the default. |
The badge text is changed through the snippet
vioveRepairCompliance.detail.badge, not in the configuration.
Customer account
Controls how claims appear in the storefront customer account.
| Setting | Default | What it does |
|---|---|---|
| Report a defect in the customer account | on | Shows the form your customers use to report a defect on their own eligible line items. The claim is created with the status Reported. |
| Visible columns in the customer account | all (order number, line item, status, reported on, deadlines) | Picks which columns the claims table shows. Select nothing and all columns are shown. |
| Date format (customer account) | Medium (e.g. 21 June 2026) | The format of the dates in the table. Short, medium or long. |
More on what your customers see in Customer account & storefront.
Warranty duration per country
You maintain this table not in the extension configuration but under Orders → Claims → Settings, in the Warranty duration per country card. The entries apply across all sales channels – statutory warranty is a legal matter, not a channel matter.
Use it to store a different warranty duration for individual countries. It overrides the base duration of the sales channel for orders shipped to that country. Without an entry, the base duration applies.
Step 1: Open Orders → Claims → Settings and go to the Warranty duration per country card.
Step 2: Click Add country.
Step 3: Pick the country and enter the duration in months.
Step 4: Use Remove to delete a row again.
Step 5: Click Save.
Manufacturer defaults
Also under Orders → Claims → Settings, the Manufacturer defaults card lets you store fallback values per manufacturer. They apply to every product of that manufacturer that has no value of its own – a value on the product always wins.
Step 1: Open Orders → Claims → Settings and go to the Manufacturer defaults card.
Step 2: Click Add manufacturer.
Step 3: Pick the manufacturer. Only one entry per manufacturer is possible – an already-used manufacturer can't be picked a second time.
Step 4: Fill in the fields you need (see table).
Step 5: Click Save. Use Remove to delete a row.
| Field | What it does |
|---|---|
| Manufacturer | The manufacturer these defaults apply to. |
| Spare-parts availability (manufacturer info) | Fallback for the spare-parts info. Can be maintained per language. |
| Manufacturer repair page (URL) | Fallback for the link to the manufacturer's repair page. Language-neutral. |
| Manufacturer guarantee (duration/scope) | Fallback for the manufacturer guarantee. Can be maintained per language. |
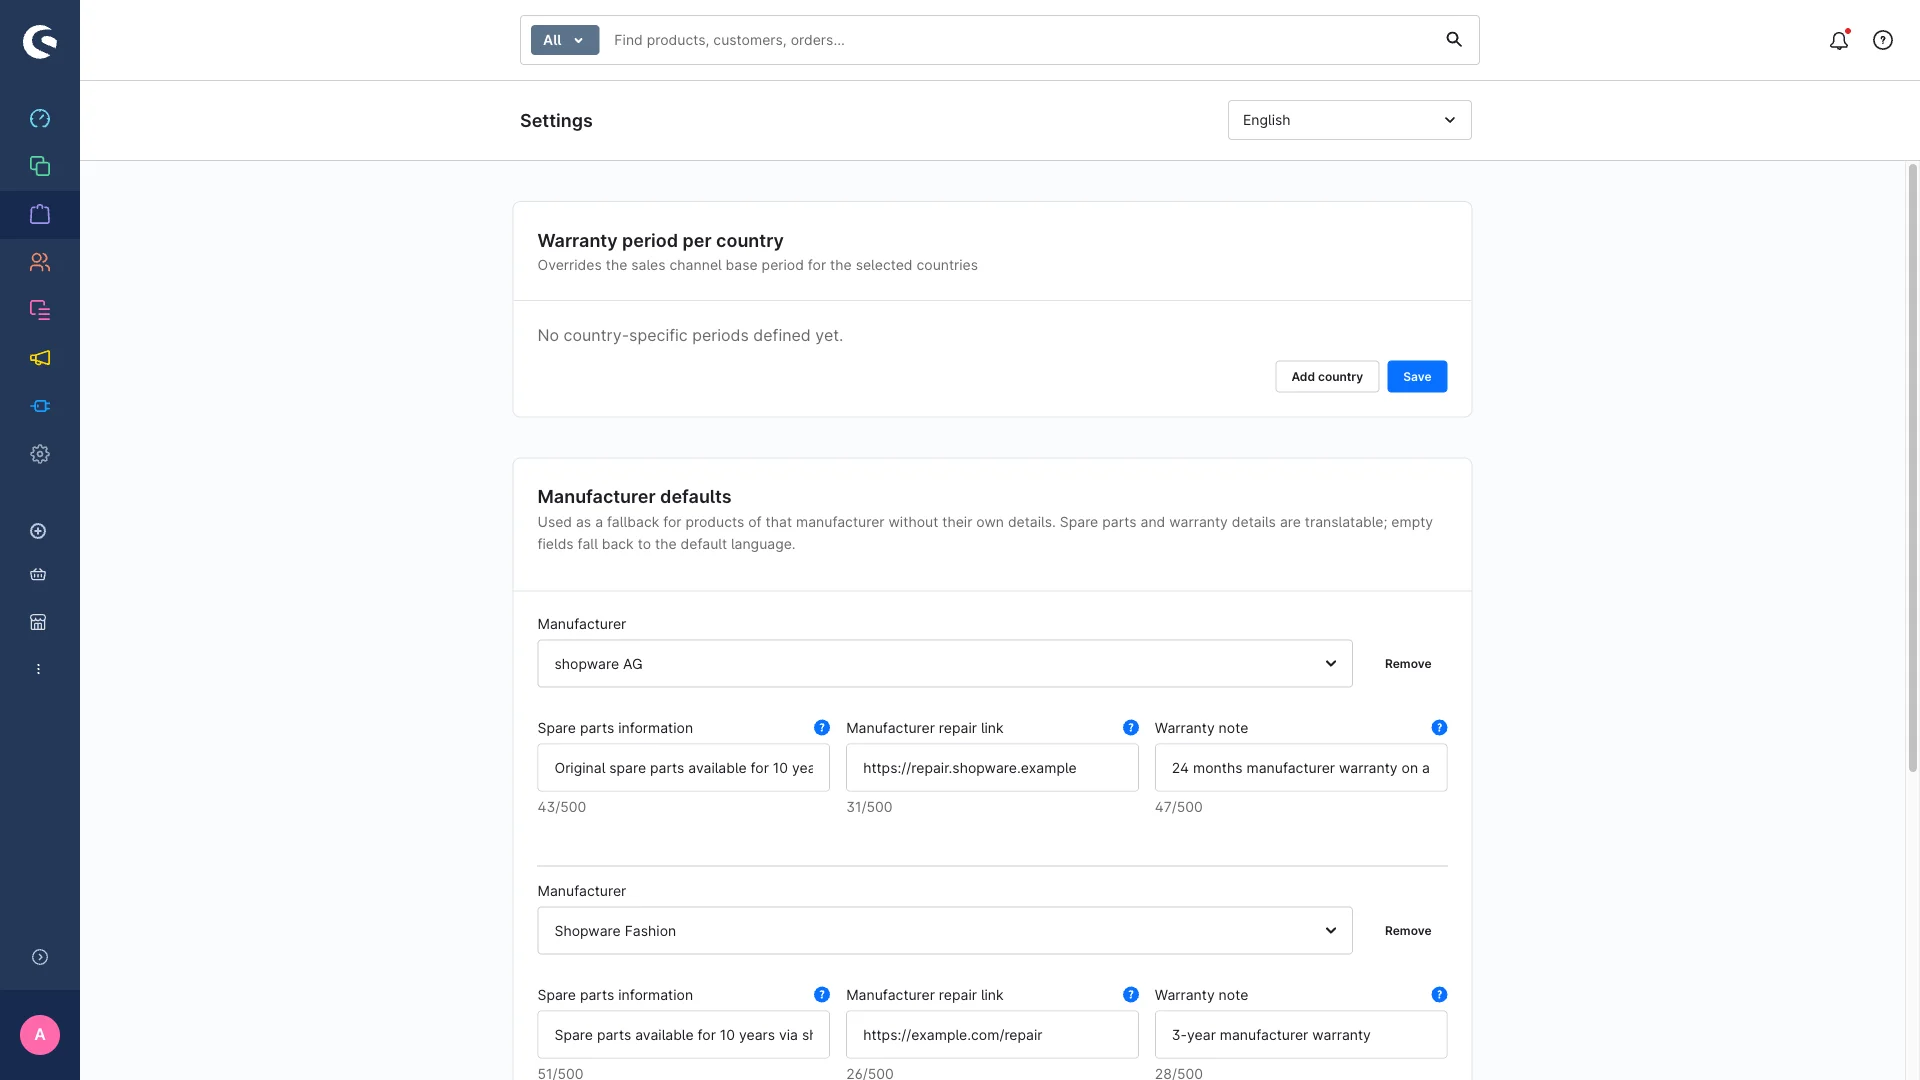
Spare-parts info and guarantee info are translatable. Use the language switcher at the top of the card to change the language you're editing. Leave a field empty in one language and it inherits the value of your shop's default language. The manufacturer repair page (URL) is language-neutral: it's stored once per manufacturer and can only be edited in the default language – in every other language the field is read-only.
Deliberately not included: repairability score, scale and source. Those are model-specific – the same manufacturer can score very differently on a smartphone and on a washing machine – so they stay product data, maintained individually or by CSV.
Editing the customer-facing texts
Every text your customers see is maintained through the snippet management (Settings → Shop → Snippets), not in the configuration. Pick the snippet set (that is, the language) first, then search for the key:
| Snippet key | What it controls |
|---|---|
vioveRepairCompliance.detail.badge | Text of the badge on the product page. |
vioveRepairCompliance.detail.disclaimer | Optional disclaimer below the product page block. Empty = no notice. |
vioveRepairCompliance.account.intro | Intro text above the claims table in the customer account. |
vioveRepairCompliance.account.remedyNotice | Notice about the right to choose between repair and replacement. |
vioveRepairCompliance.account.status.reported | Label of the status Reported in the customer account. |
vioveRepairCompliance.account.status.info_provided | Label of the status Notice given. |
vioveRepairCompliance.account.status.remedy_chosen | Label of the status Remedy chosen. |
vioveRepairCompliance.account.status.completed | Label of the status Closed. |
vioveRepairCompliance.account.nextSteps.remedyChosen | "What happens next?" note after the remedy was chosen. |
vioveRepairCompliance.account.nextSteps.completed | "What happens next?" note after the claim was closed. |
vioveRepairCompliance.detail.source.manufacturer | Translated label of the source "manufacturer". |
vioveRepairCompliance.detail.source.french_repairability_index | Translated label of the source "French repairability index". |
vioveRepairCompliance.detail.source.eu_energy_label | Translated label of the source "EU energy label". |
vioveRepairCompliance.detail.source.own_assessment | Translated label of the source "own assessment". |
vioveRepairCompliance.detail.source.other | Translated label of the source "other". |
Leave one of the two nextSteps snippets empty and no note appears in that spot.
The emails to your customers are edited in the mail template management – see Notifications & log.
Don't forget to save
After every change, click Save in the top right. The settings take effect immediately for the selected sales channel.