Right to Repair & EmpCo: Claims and Repairability - Getting started
Install, switch on per sales channel and work through the “Getting started” onboarding checklist.
This page takes you from installing the extension to your first claim. It all happens inside the Shopware administration, and it takes maybe fifteen minutes.
System requirement: the extension needs Shopware 6.7.
Install and activate
Step 1: In the administration, open Extensions → My extensions.
Step 2: Find Right to Repair & EmpCo: Claims and Repairability in the list.
Step 3: Click Install, then Activate.
Step 4: Clear the cache afterwards if Shopware doesn't prompt you to (via the cache button in the admin). That makes sure everything new shows up right away.
Installing and activating does not switch the extension on in your shop yet. That happens per sales channel – see the next section. Until then nothing changes for your customers.
Switch it on for a sales channel
The extension is switched on and off per sales channel. If you run several shops or languages, you decide for each one separately.
Step 1: Open Extensions → My extensions, find Right to Repair & EmpCo: Claims and Repairability, click the three dots and then Configuration.
Step 2: At the top, pick the sales channel you want to set up.
Step 3: In the General card, switch Enabled on.
Step 4: Repeat for every other sales channel where the extension should run.
Every other setting can be made per sales channel too – see Configuration.
Where the workspace lives
After activation you'll find the workspace under Orders → Claims. There is deliberately no extra entry in the main menu.
It has four pages:
| Page | What you do there |
|---|---|
| Overview | Getting-started checklist, status card and key figures |
| Claims | The list and the board of all claims |
| Data & import | CSV import and export for claims and product data |
| Settings | Warranty duration per country, manufacturer defaults |
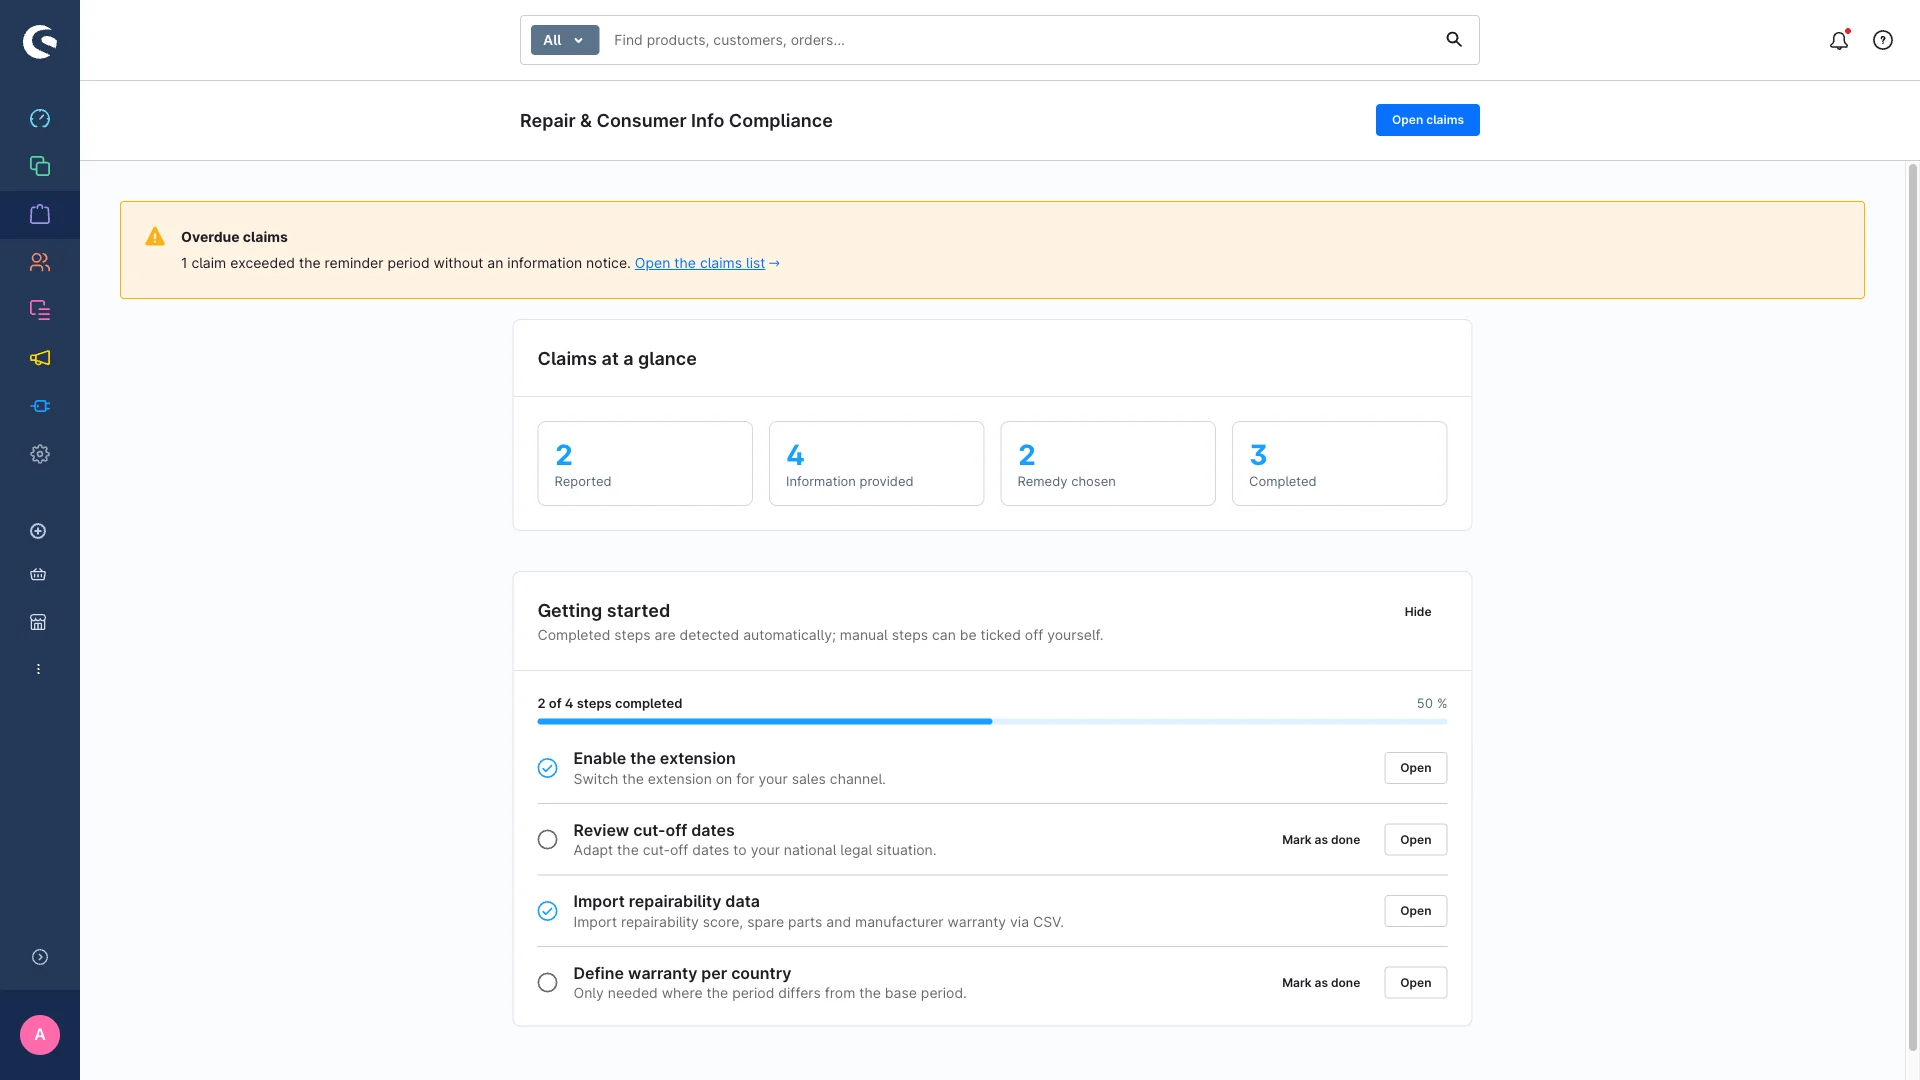
The getting-started checklist
Open Orders → Claims → Overview and you'll see a Getting started card with a checklist. It shows your progress ("… of … steps done") and walks you through six steps. You don't have to follow the order strictly – think of it as a thread to pull.
Each step gives you buttons:
- Open – jumps straight to the place where you do that step.
- Mark as done / Undo – only on the steps you confirm yourself.
Don't need the card any more? Hide removes it for good.
Steps that tick themselves
These tick automatically as soon as the condition is met – you don't have to click anything:
| Step | Ticks as soon as … |
|---|---|
| Activate the extension | … the extension is switched on for the selected sales channel |
| Import repairability data | … at least one product has repairability data |
| Log your first claim | … at least one claim exists |
| Try out the board | … at least one claim exists |
Steps you tick yourself
| Step | What it means |
|---|---|
| Check the cut-off dates | Make sure the defaults fit your market |
| Set warranty duration per country | Enter different statutory warranty durations where they apply |
A sensible order for your first days
Step 1 – Switch the extension on. Out of the box it's off. See Configuration.
Step 2 – Check the cut-off dates. The defaults are 31 July 2026 for the claims workflow and 27 September 2026 for the product page info. National implementations may differ, so check what applies in your market.
Step 3 – Set warranty durations per country. If you sell into several countries with different statutory warranty periods, enter them once. Everything else is calculated from there.
Step 4 – Import your repairability data. Easiest by CSV – see Import & export and Product page (EmpCo).
Step 5 – Log a first claim. Create one to get a feel for the flow. See Managing claims.
Step 6 – Try the board. Open the board view and drag a claim through the status columns. See Kanban board.
The status card
The Status card on the overview page tells you at a glance whether the extension is live. If it says the extension is not enabled, switch it on in the configuration first – until then neither the workflow nor the product page info does anything.
What if you uninstall later?
When you uninstall, Shopware asks whether your data should be kept:
- Keep data – nothing is deleted. Your claims, product data and settings stay. Pick this if you're only pausing.
- Remove data – the extension cleans up completely and leaves your shop the way it was before installation.
Either way, your orders, customers and products stay untouched – the extension never deletes Shopware core data. Shopping Experiences keep working too; a repair notice element placed there simply stops rendering.
If in doubt, choose Keep data when uninstalling. That way no claim history gets lost.