Right to Repair & EmpCo: Claims and Repairability - Customer account & storefront
What your customers see: “My claims”, reporting a defect, choosing a remedy and the CMS element.
This page shows what your customers see about their claims in their own account, how you adjust that view, and how to place the repair notice element in your Shopping Experiences.
Getting this part right saves your team a lot of email: customers report defects themselves, pick their own remedy and check the status without asking you.
"My claims" in the customer account
Once the extension is switched on, your customers get an extra menu entry Claims in their account, leading to the page My claims.
The page shows:
- an intro text above the table,
- a notice about the right to choose between repair and replacement,
- a table of claims – only those of the logged-in person, newest first.
If they have no claims yet, they see "You currently have no claims." instead.
Report a defect (the form)
Above the table there's an optional Report a defect form so your customers can report a defect without going through customer service at all.
The form has:
- a dropdown Affected line item listing their own eligible line items (order number, article, order date),
- a number field Affected quantity – how many units are affected (for example "2 of 4 units"). Without an entry, 1 unit is reported. The value is checked server-side against the actual ordered quantity and capped if needed,
- an optional text field Description of the defect (max 2,000 characters),
- the Report defect button.
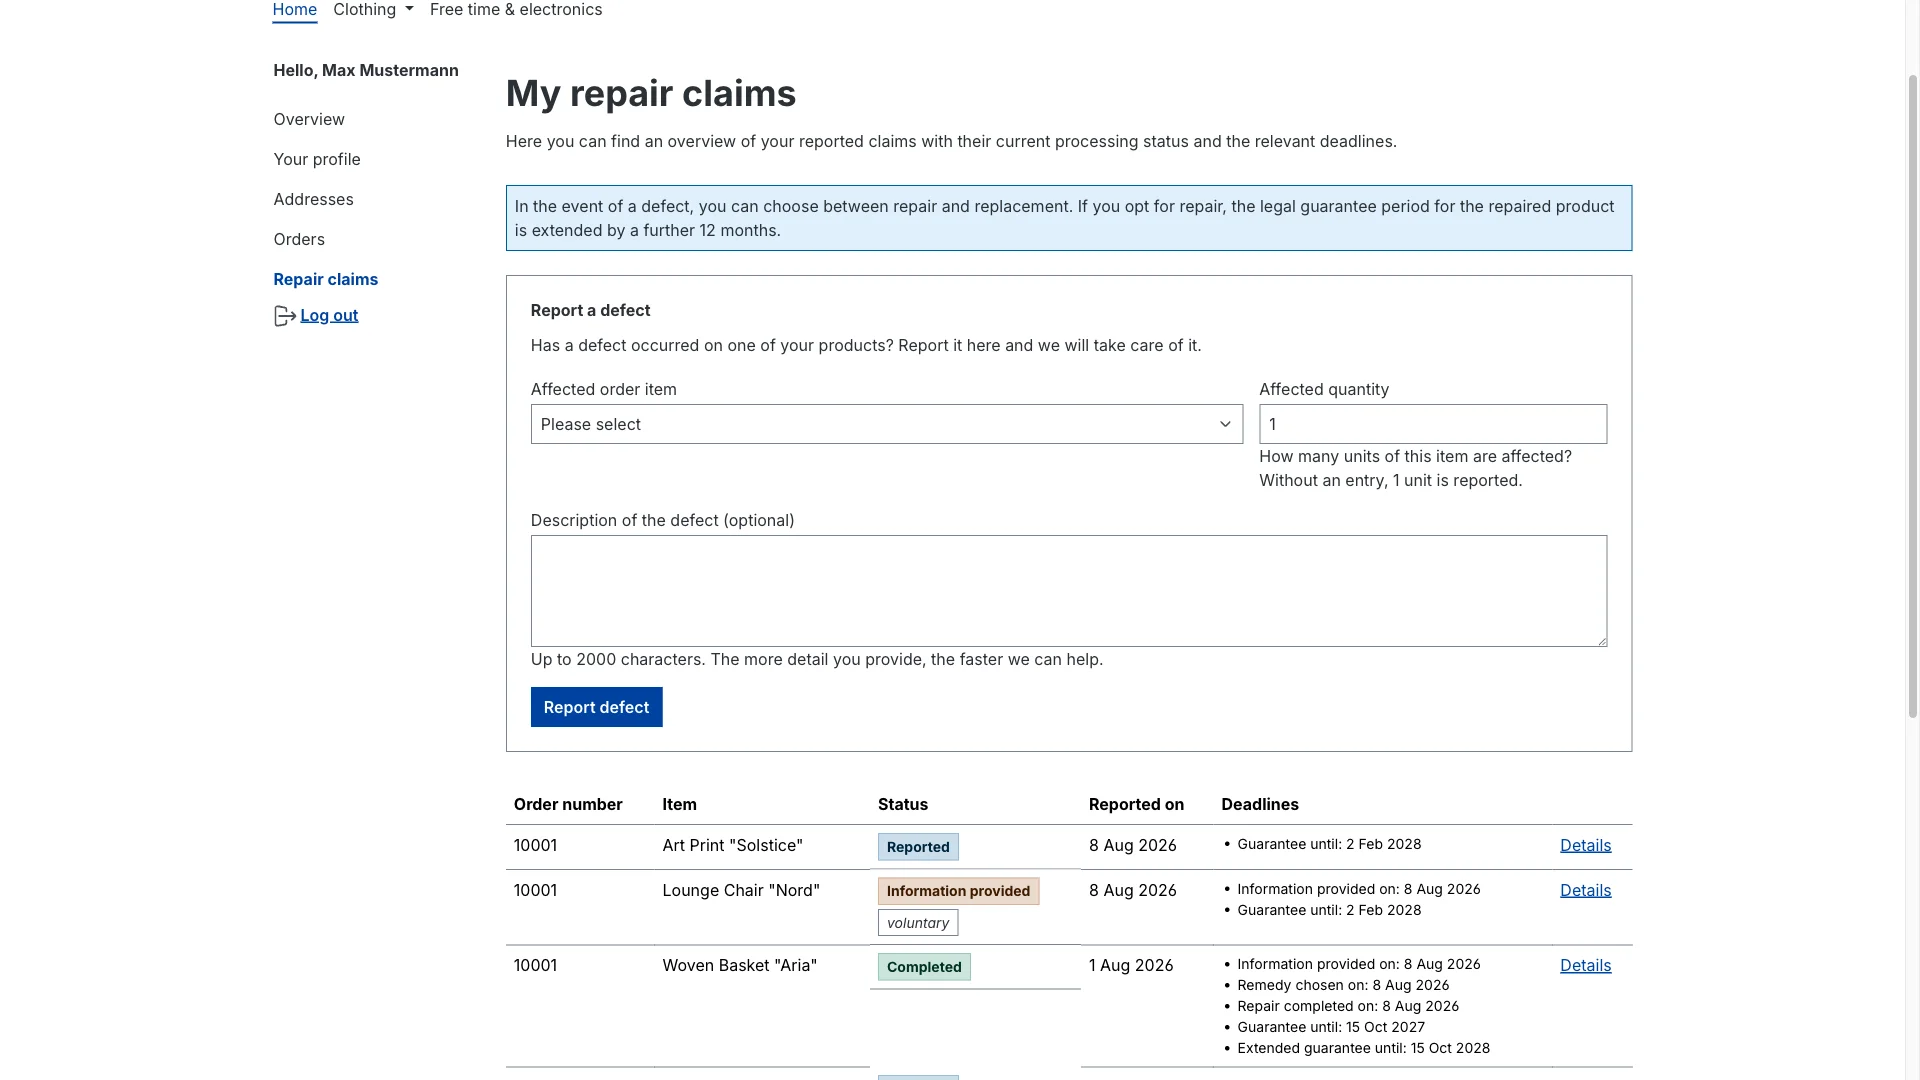
Which line items can they pick? Only ones that are genuinely eligible. A line item appears in the dropdown only when all of these are true:
- it's a product line item of their own order,
- the order is not cancelled,
- the (base) warranty for that line item has not expired,
- there's no existing claim for it.
These checks run again on the server when the form is submitted, so the selection isn't just a UI nicety.
Rate limiting: so neither a shared internet connection nor a second session can flood your inbox, the form is limited to 3 reports per minute and 5 per hour per customer. Hit the limit and they get a notice to try again later.
After submitting, the new claim appears in the table below with the status Reported. A description they entered reaches you as a customer description – a separate, read-only card on the claim detail page in the admin.
The customer description is strictly separate from the internal note you write in the admin. The internal note (card "Internal note (not visible to the customer)") is for your team only and is never shown to the customer.
You can switch the form off with Report a defect in the customer account in the configuration (Customer account card) – it's on by default. Switched off, customers only see the table.
The columns of the table
All columns are shown by default:
| Column | What the customer sees |
|---|---|
| Order number | The number of the related order |
| Line item | The affected item of the order |
| Status | The current state as a coloured badge |
| Reported on | The date it was reported |
| Deadlines | Every date that's been set so far |
The Deadlines column lists what's already fixed per claim: notice given on, remedy chosen on, repair completed on, warranty until and extended warranty until.
The status as your customers see it
| Internal state | Label in the customer account |
|---|---|
| reported | Reported |
| notice given | Notice given |
| remedy chosen | Remedy chosen |
| closed | Closed |
For claims where the statutory obligations don't necessarily apply – orders placed before the cut-off date, for instance – a voluntary marker is shown as well.
You can replace all four labels with your own wording through snippets, see Configuration.
Customers pick the remedy themselves
When a customer clicks a claim in status Notice given, the detail page shows an extra card Your choice with an intro text and two buttons:
- Choose repair
- Choose replacement
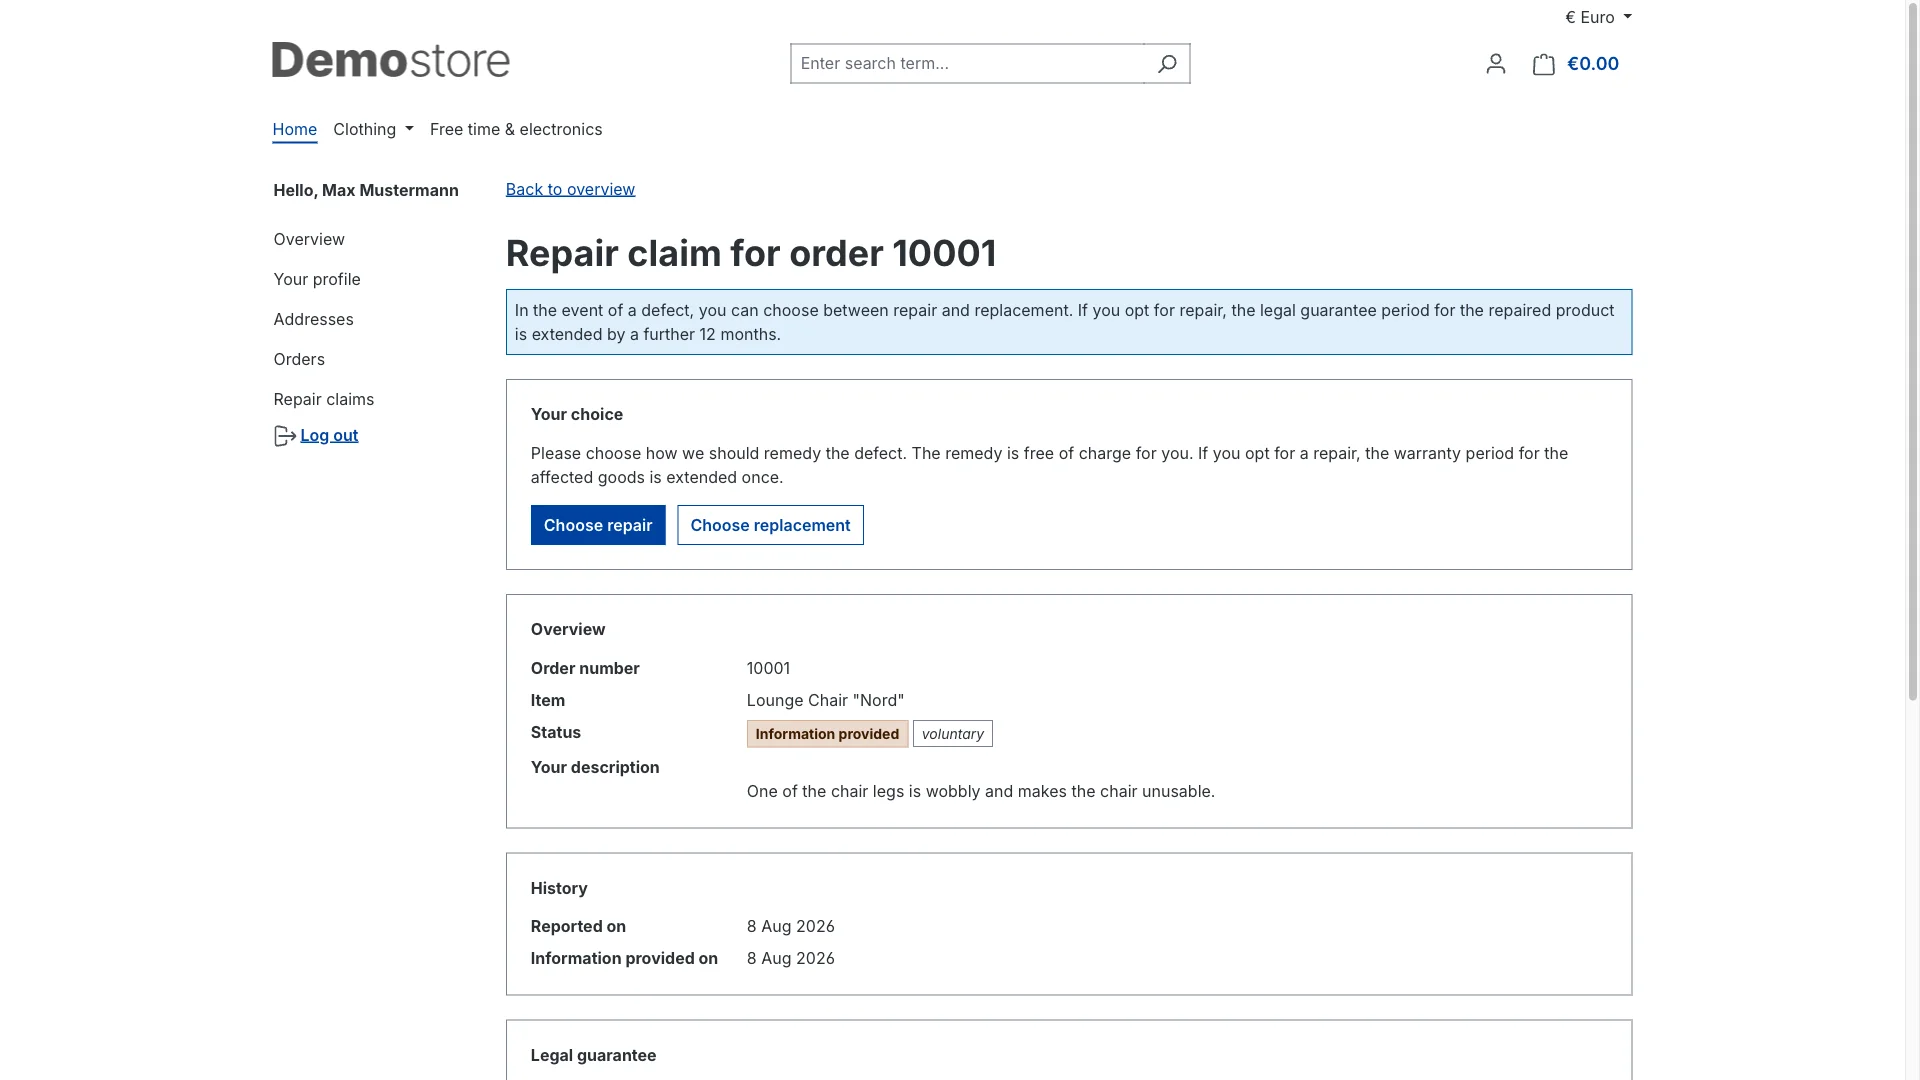
One click sends the choice to the shop, the claim moves to Remedy chosen, and the customer gets a success message. This is fully equivalent to the Confirm the choice step in the admin – both routes write the same log entry and trigger the same confirmation email (if sending is on). See Managing claims.
The card only appears for their own claims and only in the matching status. Anyone trying to open someone else's claim directly gets nothing, and the choice is rejected.
The intro text of the card comes from the snippet
vioveRepairCompliance.account.remedyNotice.
The notice email also links straight to this page with a button, so your customers don't have to hunt for the claim in their account.
"What happens next?"
After the choice (status Remedy chosen) and after closing (status Closed),
the detail page also shows a What happens next? note. You maintain the
wording through the snippets
vioveRepairCompliance.account.nextSteps.remedyChosen and
vioveRepairCompliance.account.nextSteps.completed – put your logistics details
in there (return, pickup, who to contact). Leave one empty and no note appears in
that spot.
Adjusting the customer account view
All of these live in the configuration under the Customer account card.
| Setting | Default | What it does |
|---|---|---|
| Report a defect in the customer account | on | Shows or hides the report form above the table |
| Visible columns in the customer account | all columns | Pick which columns the table shows. Select nothing and all are shown. |
| Date format (customer account) | Medium (e.g. 21 June 2026) | How dates are rendered in the table: short, medium or long |
The intro text, the notice about the right to choose and the four status labels are edited through snippets in your shop's snippet management:
| Snippet key | What it controls |
|---|---|
vioveRepairCompliance.account.intro | Intro text above the table |
vioveRepairCompliance.account.remedyNotice | Notice about the right to choose repair or replacement |
vioveRepairCompliance.account.status.reported | Label of the status Reported |
vioveRepairCompliance.account.status.info_provided | Label of the status Notice given |
vioveRepairCompliance.account.status.remedy_chosen | Label of the status Remedy chosen |
vioveRepairCompliance.account.status.completed | Label of the status Closed |
vioveRepairCompliance.account.nextSteps.remedyChosen | "What happens next?" after the remedy was chosen |
vioveRepairCompliance.account.nextSteps.completed | "What happens next?" after the claim was closed |
The "repair notice" CMS element
For Shopping Experiences there's an extra element: Repair notice (right to repair). Use it to place a notice about repair, warranty and the right of withdrawal on a service page or a cancellation page, for instance.
Step 1: Open Content → Shopping Experiences in the admin and edit the layout you want (or create a new one).
Step 2: Add a section or block and drag the Repair notice element where you want it.
Step 3: Fill in the element's two fields (see below), or leave them empty.
Step 4: Save the layout and assign it to the page or category you want.
| Field | What it does |
|---|---|
| Heading (optional) | Your own heading above the notice. Leave empty for no heading. |
| Notice text | Your own text. Leave it empty and the sample notice that ships with the extension is shown. |
The sample notice covers the right to choose between repair and replacement, the statutory warranty and the right of withdrawal. Like every other storefront text, its wording is editable in the snippet management.
No legal advice: all shipped texts are samples. Have them reviewed before you publish them.