Right to Repair & EmpCo: Claims and Repairability - Kanban board
Drag claims through the four status columns, filter them and search by order number.
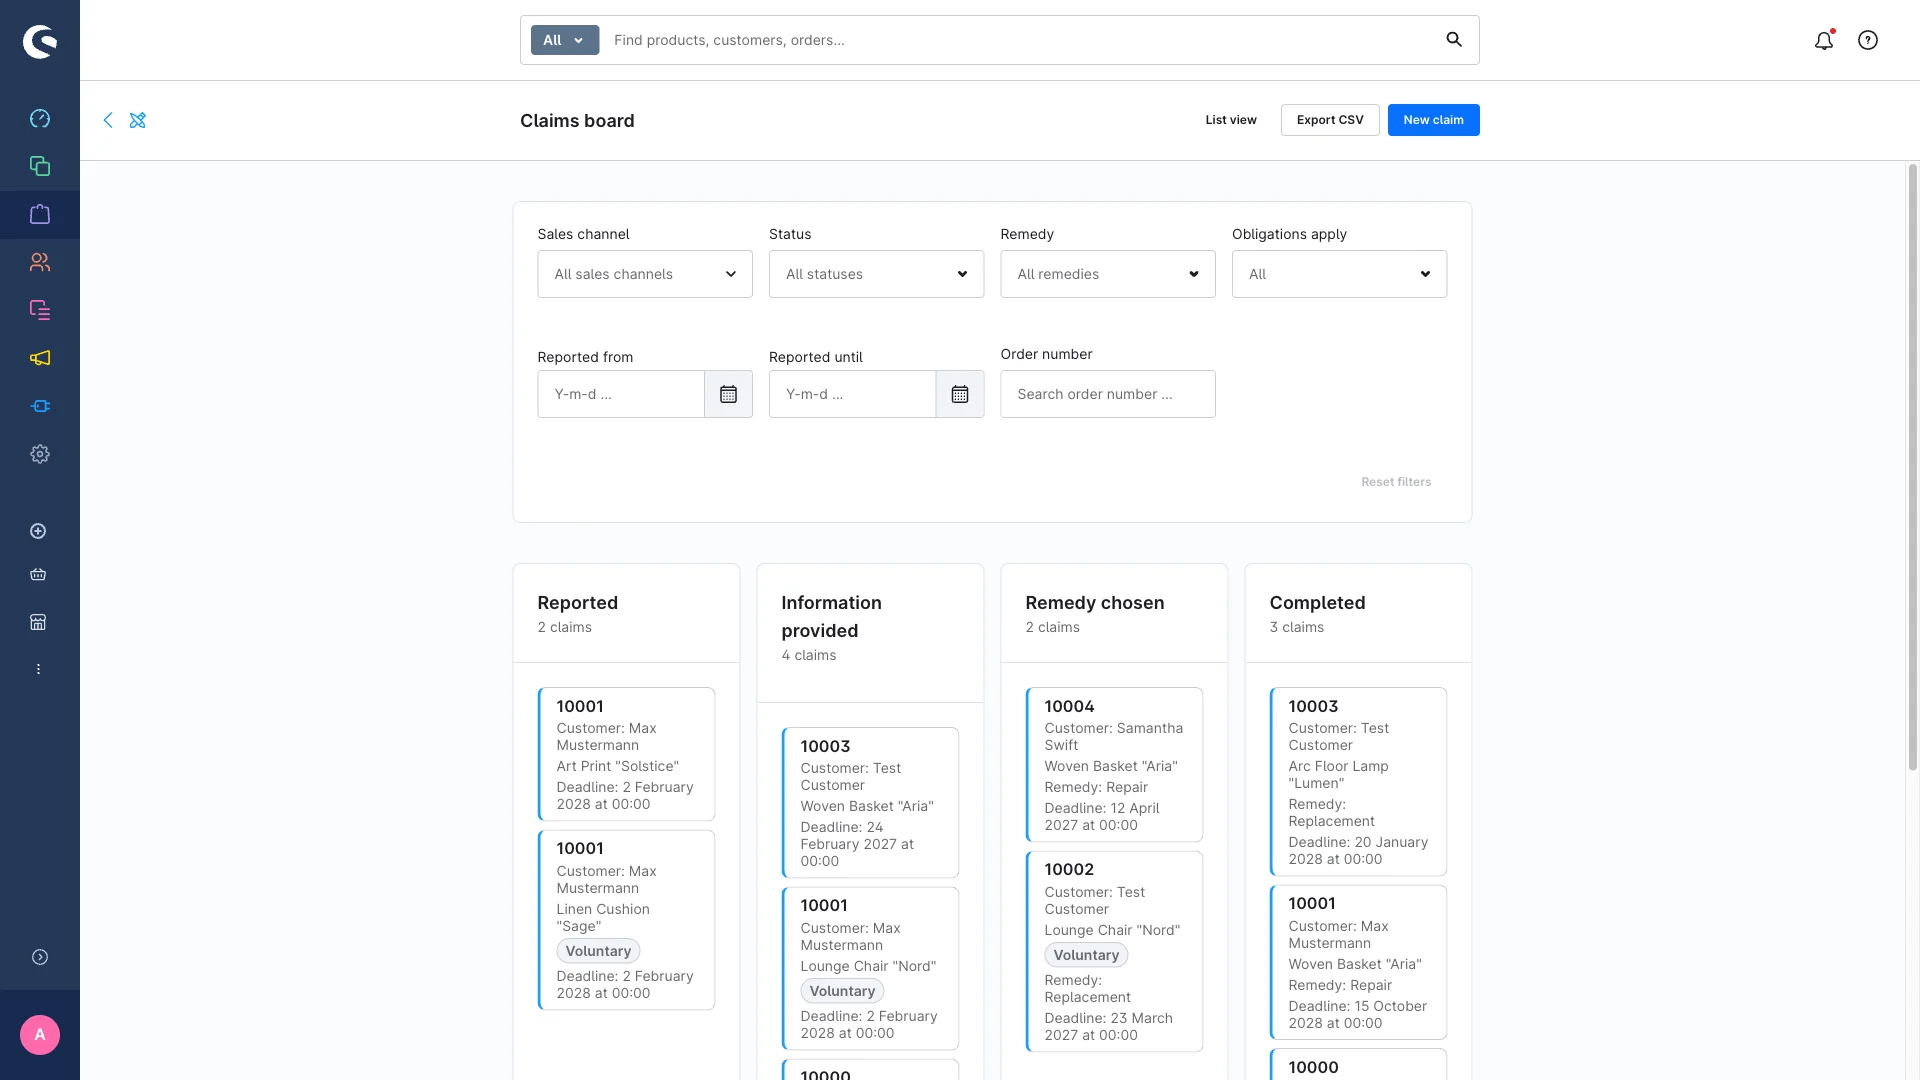
Next to the list there's a board view. It shows your claims as cards in four columns – one per status. The board is what you want when you're keeping an eye on a lot of claims at once and moving them along quickly.
Switch between list and board
Both views show the same claims, just differently.
Step 1: Open the module under Orders → Claims and click Claims. You land in the list first.
Step 2: Click Board view in the top right. The Claims — Board page opens.
Step 3: The List view toggle takes you back to the table any time.
Which one suits you is a matter of taste: the list is good for sorting and searching, the board for moving things fast.
The four columns
From left to right they follow the normal flow of a claim:
| Column | What it means |
|---|---|
| Reported | Newly logged, nothing done yet |
| Notice given | The customer was told about the right to choose |
| Remedy chosen | Repair or replacement is decided |
| Closed | Case done |
The statuses are explained in full in Managing claims.
What a card shows
Each card sums a claim up:
- Customer – who the claim is about.
- Deadline – the relevant date, for example the end of the warranty.
- Voluntary badge – only appears when the claim is not eligible. Eligible claims carry no badge.
- Remedy note – the chosen remedy, once it's decided.
Click a card to open the claim's detail page.
Move a card (change the status)
This is the whole point of the board:
Step 1: Click a card and hold the mouse button.
Step 2: Drag it into the column you want.
Step 3: Let go. The claim's status is set to that column immediately.
You're not bound to any order here. The board allows moving forwards and backwards – you can drag a card straight from Reported to Closed. Timestamps that are already set stay; only missing ones get filled in.
Two things worth knowing:
- The extension on closing: drag a claim to Closed and – exactly like the "Mark as repaired" button – the one-time 12-month warranty extension is applied if the conditions are met (repair chosen, eligible, not yet extended).
- Emails on the board: unlike on the detail page, moving a card does not send an email automatically. An email only goes out if you actively ask for it and email sending is switched on in the configuration.
Moving cards needs the Edit permission. With read-only access you can look at the board but not change anything. See User permissions.
"Load more" for long columns
To keep the board fast, each column shows only part of its cards at first. If a column is longer, you'll find a Load more button at the bottom. Click it to pull in the next batch – as often as you need until everything is visible.
Filter and search
Above the columns you get the same filters as in the list:
| Filter | What it's for |
|---|---|
| Sales channel | Only claims from one sales channel |
| Status | Narrow down to one status |
| Remedy | Filter by repair or replacement |
| Obligations apply | Eligible or voluntary claims |
| Reported from / Reported to | The period the claim was logged in |
| Search order number … | Jump straight to one order number |
Reset filters clears everything again. The filters work the same in board and list view.
Sorting and searching in the list
If you prefer working in a table, switch back with List view. There you also get:
- Sorting: click a column heading (order number, status, a date) to sort by it. Another click reverses the order.
- Searching: the Search order number … field finds a specific claim fast.
- Filters: the same ones as on the board.
A typical working day
Step 1: Open the board and filter it to the sales channel you're working on.
Step 2: Check the Reported column for new claims.
Step 3: Open a card, review the case and give the notice about the right to choose – best done from the detail page, so the email goes out automatically (if sending is on).
Step 4: Once the customer has decided, drag the card on to Remedy chosen, and to Closed when you're done.
For the full flow of a single claim, read Managing claims.