
Pitching Set
Upload Screenshots to App Store Connect
Last updated:
Pitching Set syncs languages, product page texts, and App Store Connect screenshots directly. That needs Pro and an API key. Pitching Set doesn’t submit or publish anything. You do that in App Store Connect.
The images in this chapter show the app's demo data, not a real run.
Set up an App Store Connect API key
You need an API key instead of a password. Pitching Set stores it only in this Mac's keychain, not synced, and never in project packages.
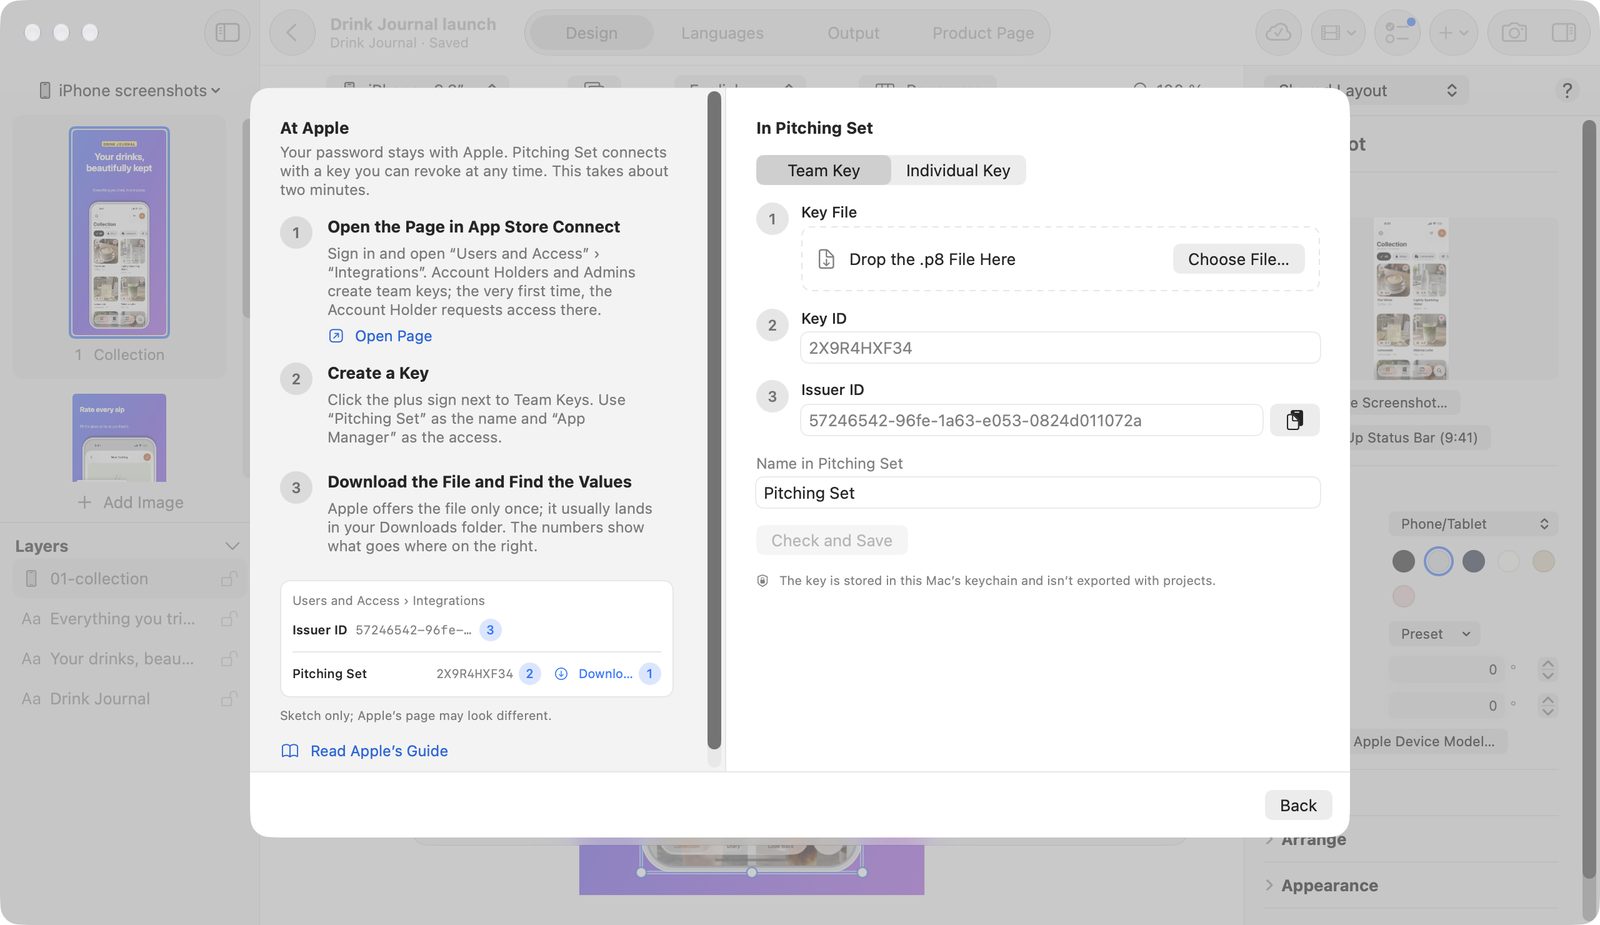
- Open Settings (⌘,) and choose App Store Connect. In the App Store Connect window, Set Up a Key… also takes you there.
- Click Add Key….
- Choose Team Key or Individual Key.
- Create the key in App Store Connect as the instructions beside the form describe, and download the .p8 file. Apple offers the download only once.
- Drag the file onto Drop the .p8 File Here, or click Choose File… under Key File.
- Check the Key ID, which Pitching Set takes from the file name, and for a team key enter the Issuer ID.
- Click Check and Save. If App Store Connect isn't responding right now, Save Anyway remains; if Apple rejects the key, the app saves nothing.
The App Manager role is usually enough. Apple's instructions: Creating API keys for App Store Connect API (checked November 6, 2026).
Under Settings → App Store Connect, you manage several keys under API Keys with Check Again and Remove…. The list of reachable apps with their bundle IDs is there too.
The key is read once per launch. If the keychain prompt sits behind the app, a note appears.
Connect an app
Pitching Set connects your app itself when the bundle ID or name matches unambiguously. Otherwise choose Connect to App Store Connect… in the app's context menu, or click Connect… in the window. Choose Another App… changes the link.
The App Store Connect window
Click App Store Connect in the toolbar, App Store Connect… in Output, or Sync Languages, Texts, and Screenshots… on the product page.
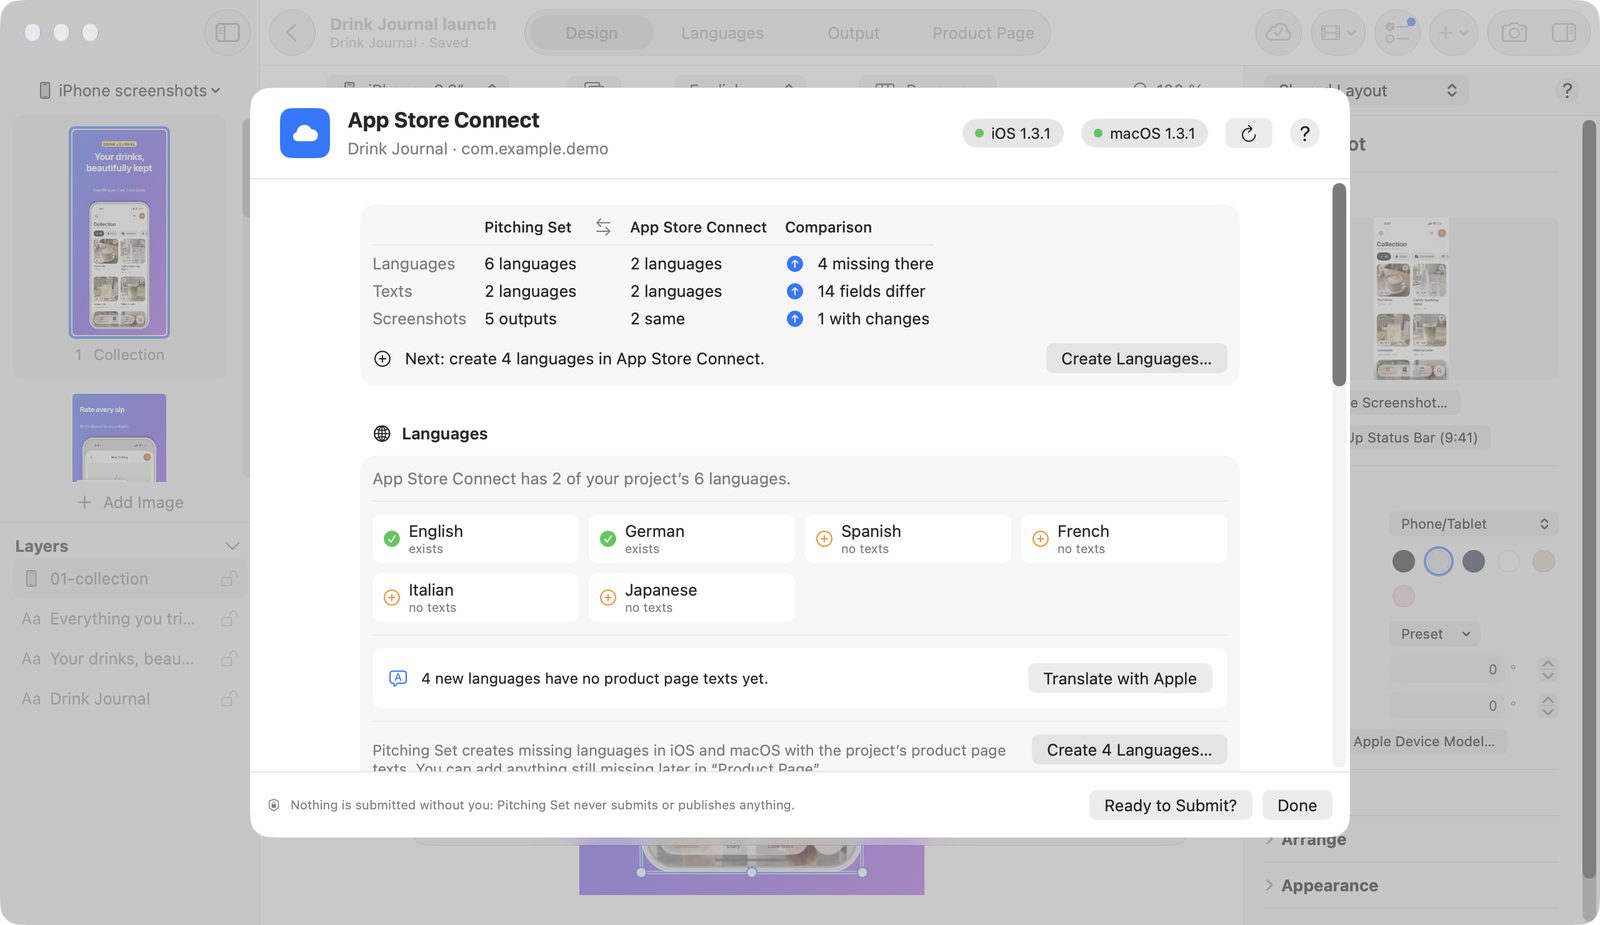
At the top are the app name, bundle ID, and one version capsule per platform. Reload reads the state again. If something's missing, the window shows a matching button, such as Set Up a Key…, Connect…, or Open Settings….
At the bottom it says: Pitching Set doesn’t submit or publish anything. You do that in App Store Connect.
Versions are named by state, such as in preparation, waiting for review, in review, live, rejected, or removed from review.
Add a localization in App Store Connect
The Languages card compares your project's languages with App Store Connect and creates the missing ones.
- Read the mark for each language: present, will be created, no texts, not available.
- Click “Create N Languages…” and confirm. The app reads the state fresh first, so nothing gets created twice.
- Fill new languages without texts with Translate with Apple. That fills only empty fields, counts as one undo step, and has Stop.
The app creates languages in the app information and in every version in preparation on every platform. New languages get the project's texts per platform, missing URLs from an existing language, and only valid, filled-in fields. What’s New comes along only for updates.
The app maps project languages to App Store codes, such as de to de-DE. It skips languages Apple Translation doesn't offer and names them at the end.
Review and send texts
Review and Send Texts… shows each changed field before and after, with marked words. Nothing is sent until you click.
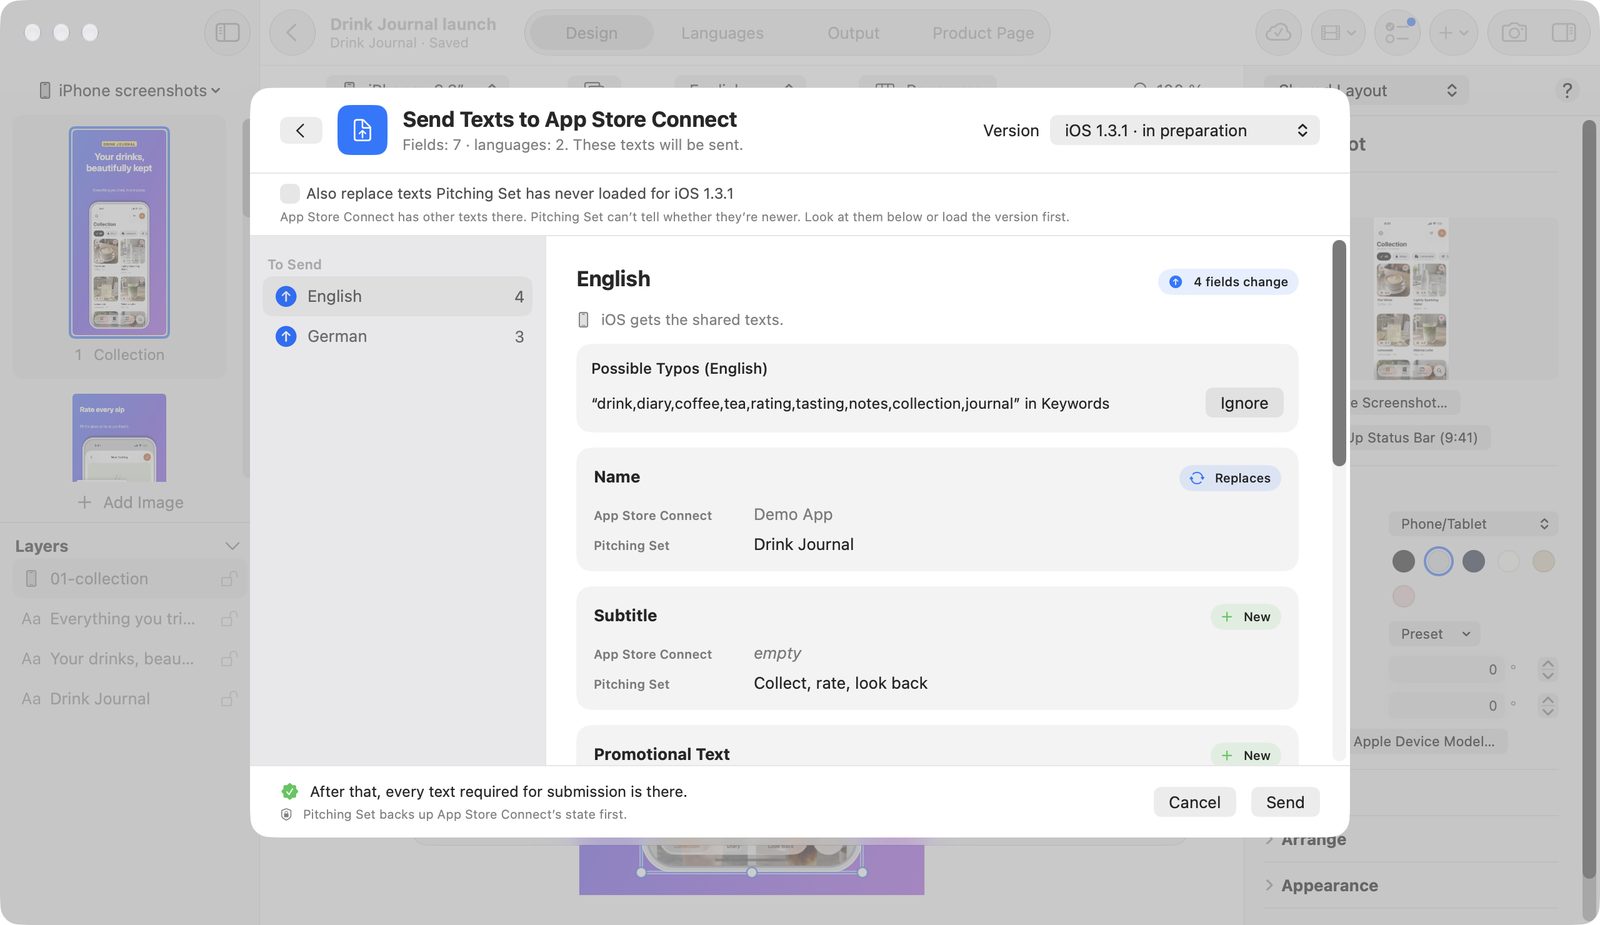
- Under Product Page Texts, open Review and Send Texts….
- Read the groups To Send, Held Back, Matches, and Missing in App Store Connect.
- Check the field cards. The marks are New, Replaces, Kept: newer there, Kept: different there, and Fix first.
- Look at Possible Typos. They block nothing; Ignore applies to this project.
- Click Send. The app reads fresh, compares, makes a backup, and sends per language.
Afterward the app names the fields sent and whether all required texts for submission are there. Send the Rest Again repeats what was missing. “Continue with macOS 1.1” leads to the next platform.
Safety rules
- Empty fields are never sent.
- Changes made in App Store Connect since the last load stay in place. Overwriting them takes a switch, and the card then shows Overwrites a newer version.
- Texts for versions that were never loaded stay in place too.
- Name and subtitle are shared; other texts apply per platform version.
The grid shows the state per platform version and language: same, changed fields, newer there, different there, review, locked for now, or missing, create above. There are at most three versions per platform: in preparation, with Apple, and live. If there's nothing to send, the button reads View Texts….
Load texts
Load from App Store Connect… brings the texts there into the project, as one undo step. Languages only App Store Connect has are added. The first platform fills the shared texts; differences on other platforms become those platforms' own texts. Loading a further platform never changes the shared state. Load All Platforms is one step.
Backups and undo
Before each text transfer and each restore, the app backs up the state in App Store Connect, keeping the latest 20 per project.
- Undo… right after sending returns to the backup made before this transfer.
- Restore an Earlier State… in the product page's App Store Connect menu shows backups by date and compares App Store Connect now with Saved state. Restore sends it.
Upload screenshots
The app renders each output, compares it with App Store Connect, and after your confirmation sends what differs. It determines the destination by exact pixel size.
- In the window, open Screenshots and Headers. The check runs on opening and uses a fingerprint to skip what hasn't changed.
- A click on a language chip excludes or includes the language.
- If needed, turn on Replace the screenshots already in App Store Connect with the ones from Pitching Set. Otherwise other images stay.
- For a full format, allow Briefly make room while swapping when a format is full.
- Click Send…. The confirmation names the numbers: new, replaced, removed.
Check Again checks everything. The states are Being checked, Same as in App Store Connect, Sending, and Sent and confirmed. If something can't go yet, the app gives the reason, such as a missing language or no version in preparation.
The destinations are iPhone, iPad, Mac, Apple Watch (to the iOS version), Apple TV, and Vision Pro.
According to Apple, App Store Connect accepts up to ten screenshots per device size (checked November 6, 2026). If a format has more, the app sends the first ones and names the rest up front.
During processing
“Sent. Apple is still processing the images.” isn't an error. The app confirms the images by itself as soon as Apple is done, without another upload. Once Apple has processed all images, it says so once: as a short note in the foreground, otherwise as a silent notification.
Receipts per slot prevent duplicates, even after interrupted runs. If a slot changes along the way, you get a conflict rather than an overwrite.
Header and search images
Product Page Header · 21:9, Search Result · 3:2, and Header & Search · 16:9 go to the iOS version in the same window as the screenshots. The first image per language goes. Images for a specific slot take priority; the universal image fills only free slots, and images set by hand stay. In-App Event images stay export only.
Send app previews
You send videos from the video editor with To App Store Connect…, see App previews and videos.
Prepare A/B tests
With treatments, you try out other screenshots in an A/B test. Pitching Set prepares this; you start the test in App Store Connect. Apple calls these tests Product Page Optimization.
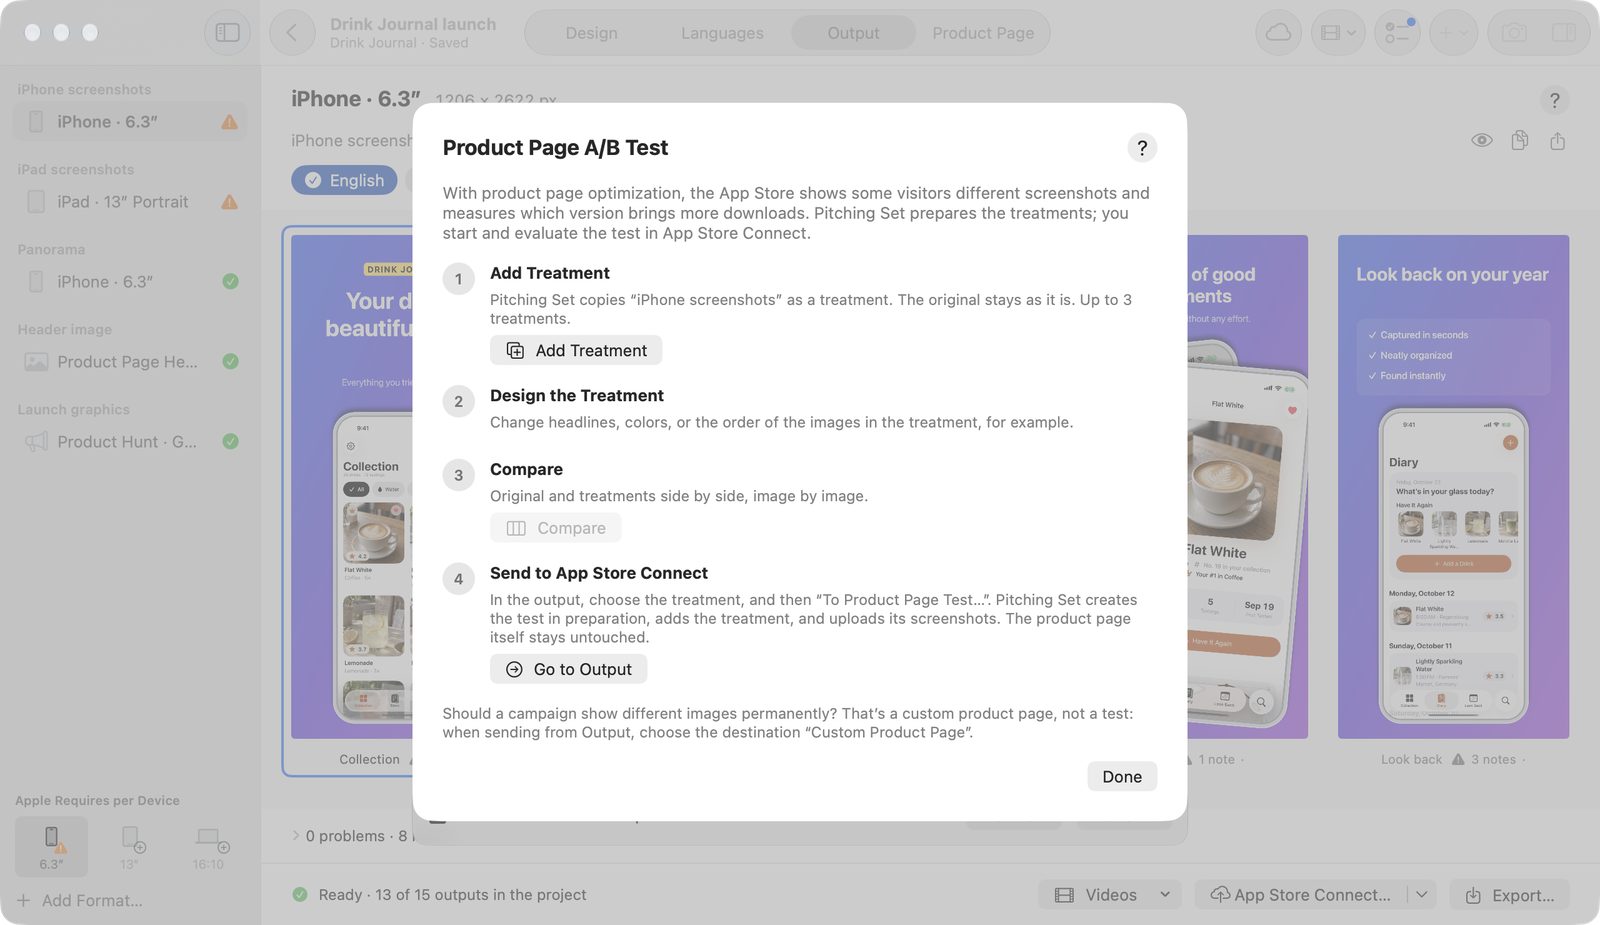
Add and compare treatments
- In Design, choose A/B Test… from the Set and Format menu. The guide Product Page A/B Test has four steps.
- Click Add Treatment.
- Design it under Design the Treatment, such as with other headlines, colors, or another order.
- Click Compare. Compare Treatments shows the original and treatments image by image, with Changed and Same.
Pitching Set copies the whole set as treatment A, B, or C. The original stays. Treatments exist for iPhone and iPad sets, up to three per set. Manage Sets… holds the same commands, such as Add Treatment and Delete Treatment….
Send to a product page test
- In Output, choose the treatment.
- Click To Product Page Test….
- Choose a test in preparation or create one with New Test…, with Test name and a visitor share of 5 to 100 %. Then Create Test.
- Click Check Preview.
- Click Send These Changes Now.
The app creates the test, treatment, and language if needed and uploads the screenshots. The test starts only when you submit and start it in App Store Connect. The app doesn't change submitted or running tests, and treatments never reach the live product page.
Custom product pages
Custom product pages show certain visitors their own images.
- In Output, choose an App Store format from a normal set.
- Open the menu on the App Store Connect… button and choose To Custom Product Page….
- Choose an existing page or create one with New Page… and Page name.
- Click Check Preview.
- Click Send These Changes Now.
The app creates drafts only. You submit the page for review in App Store Connect. If a page is in review, afterward use Create a New Version of the Page to start a new version.
Ready to submit?
Ready to Submit?… in the product page's App Store Connect menu checks the version in preparation, read-only.
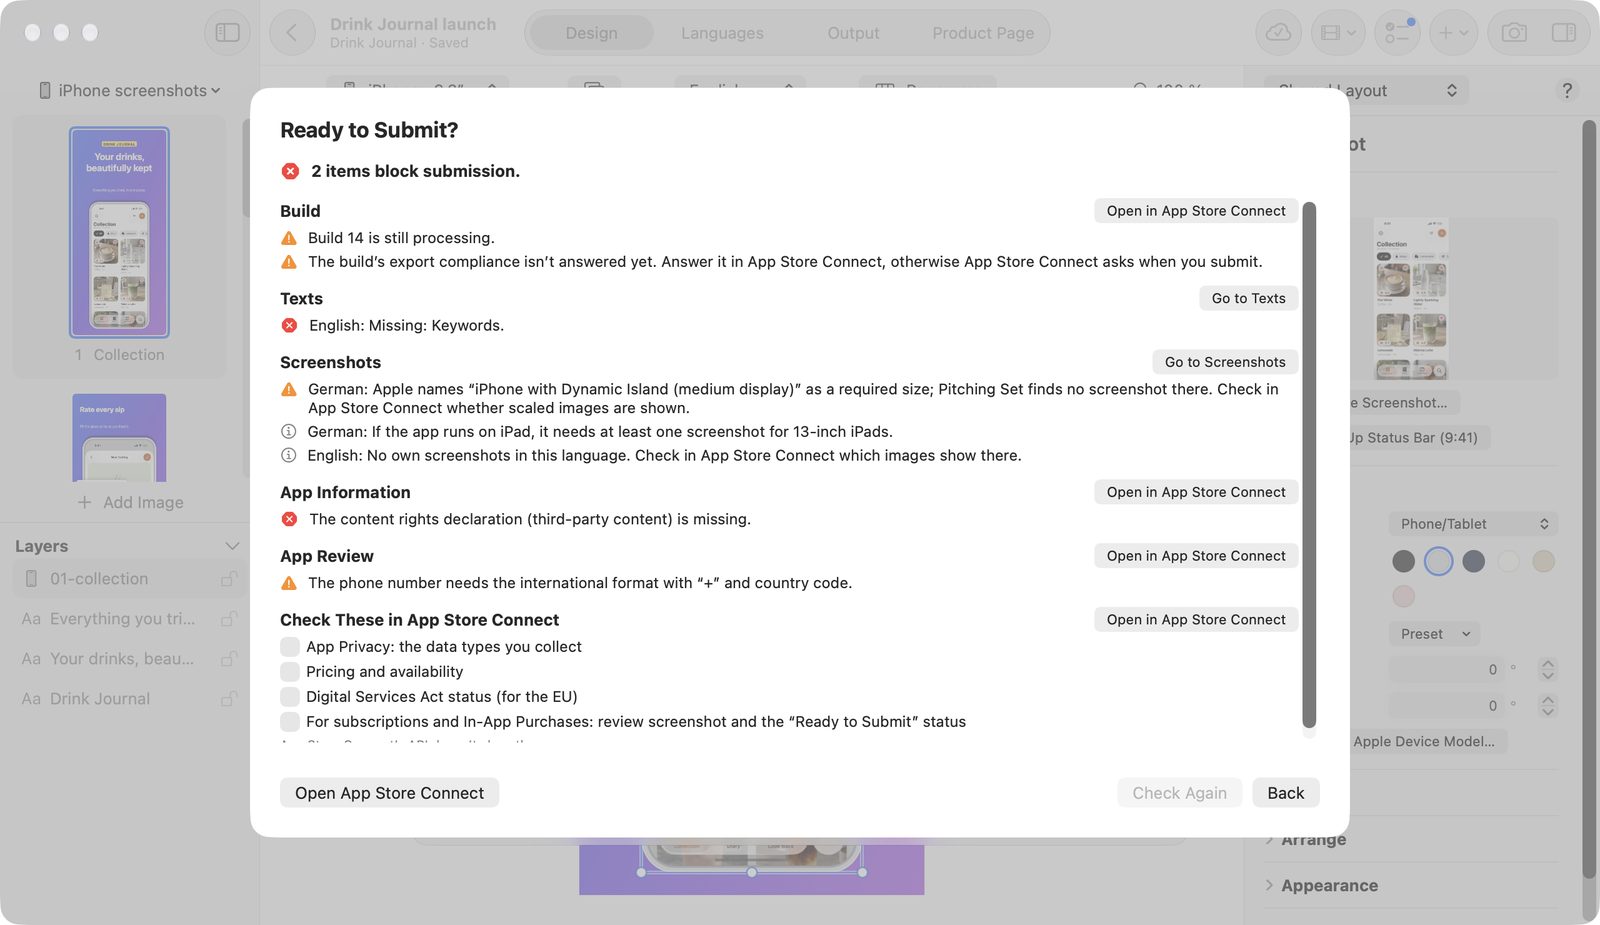
It checks:
- the build (chosen, valid, processed, export compliance)
- copyright
- required texts per language
- required screenshots
- privacy policy URL
- category
- content rights
- age rating
- contact details and the demo account for App Review
The result is Blocking and Done, plus Check These in App Store Connect with items the app can't see: App Privacy, prices, Digital Services Act, and subscriptions. The result is no promise that Apple will accept the app.
Sending in the background
You can close the window. Sending, creating languages, and confirming continue, even for several projects at once; only a pure check run stops.
- A ring in the toolbar, also in the project overview, shows progress, or spins when the app is only waiting for Apple.
- The popover names the step per project and offers Stop (halts after the current step) and Open App Store Connect, and shows All done.
- Quitting while writing asks first: Pitching Set is sending to App Store Connect. with Keep Sending and Quit.
- If the app is in the background, the notifications “Languages in App Store Connect” and “Screenshots in App Store Connect” appear.
What Pitching Set never does on its own
Submit or publish, start tests, change running tests or pages in review, and send without asking. Connections go only to api.appstoreconnect.apple.com. Read requests are retried in a controlled way, write requests never blindly; their outcome then counts as unknown.
If Apple rejects something, it appears with the field and reason. The individual messages are in Troubleshooting.
Free and Pro
Everything in this chapter except adding and comparing treatments needs Pro. The buttons carry PRO. Without Pro, you export the required formats as PNG files and upload them to App Store Connect yourself.