
Pitching Set
The App Store Screenshot Editor
Last updated:
In Design mode (⌘1), you build your images from texts, screenshots in devices, shapes, and backgrounds. This App Store screenshot editor always shows exactly one output on the canvas: one format in one language.
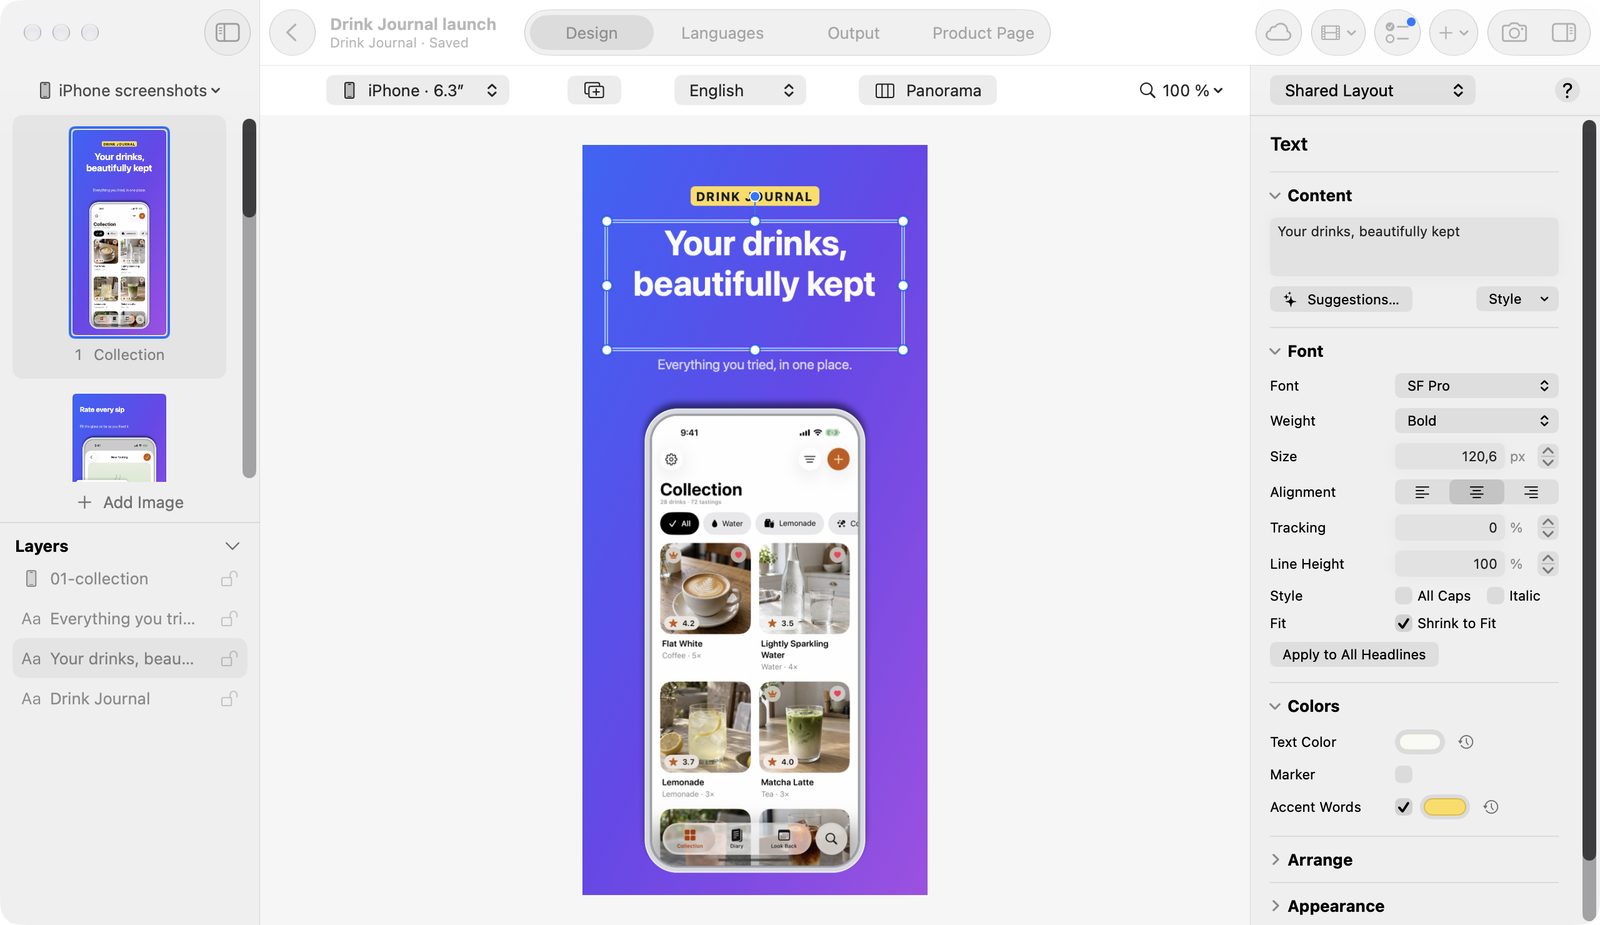
The project window
The toolbar contains:
-
Projects returns to the overview.
-
The modes Design (⌘1), Languages (⌘2), Output (⌘3), and Product Page (⌘4).
-
Video contains App Preview… and Promo Video… (Pro).
-
Next Steps shows the checklist, see Getting started.
-
App Store Connect opens the sending window (Pro), see App Store Connect.
Switching mode keeps text you're typing. The mode is remembered per project.
Above the canvas, Format and Language choose the output shown. The Panorama switch (from two images up) and the zoom are there too.
Insert objects
The Insert menu in the toolbar adds a new object.
- Open Insert.
- Choose Screenshot… (⇧⌘I), Text (⇧⌘T), Label, Rectangle, or Circle.
Text starts in editing mode. Rectangle comes in the accent color. Circle stays round in every format.
More entries in Insert:
- Add Image, Delete Image, Duplicate Selection
- Bring to Front, Send to Back
- Hide Layers or Show Layers
- Continue Across Images turns the selection into a panorama object, see Panoramas.
- Recompose for This Format rearranges a template set for another page shape. That's one undo step.
The object kinds are text, picture, screenshot in a device, image area (a placeholder for a screenshot or app icon), and shape.
Work on the canvas
Zoom and pan
Zoom runs from 50 to 300 %, where 100 % means fit to window. It zooms around the pointer.
- Zoom In (⌘+), Zoom Out (⌘−), Zoom to Fit (⌘0)
- ⌘ and scroll, or two fingers, zoom smoothly.
- Space and drag moves the view.
Select
- Click selects; ⇧-click or ⌘-click adds or removes.
- Dragging on empty space draws a selection rectangle, adding with ⇧.
- ⌘A selects everything, Esc deselects.
- A click on empty space deselects and ends text editing.
- An outline on hover shows the click target. Selected objects stay draggable even when others cover them.
- ⇥ and ⇧⇥ step through objects in reading order. ⌃⇥ leaves the canvas.
With nothing selected, the arrow keys change the image.
Move and snap
Objects snap to the page edge, the page center, and the edges or centers of other objects while you drag. Yellow guides show this. Spacing lines with a number give the distance to the nearest neighbors. Objects also snap while you resize them.
- ⌘ while dragging: no snapping
- ⇧ while dragging: horizontal or vertical only
- ⌥ while dragging: drag a copy, the original stays
- Esc while dragging: cancel
- Arrow keys: 1 output pixel, 10 with ⇧
A readout shows the X and Y position in output pixels.
Resize and rotate
A selected object has eight handles that follow its rotation, plus a size readout.
- Pictures, screenshots, and Apple frames keep their aspect ratio; other objects do with ⇧ or ⌘.
- ⌥ resizes from the center.
- The rotation handle rotates the object, in 15° steps with ⇧, without snapping with ⌘. Apple original frames don't have this handle.
Edit text in place
Double-click a text or press Return with a text selected. Return accepts, Esc discards. On a picture or screenshot, a double-click opens the image picker.
Copy and paste
⌘C, ⌘X, and ⌘V work with objects. Images pasted from other apps replace the image's screenshot; plain text up to 1 MB becomes a text object. With a picture or device selected, ⌘V replaces its content. In the image list, ⌘V creates a new image with the picture.
Copy Image as PNG (⇧⌘C) puts the image shown on the clipboard at export size. For a Pro output, the purchase page appears.
Import from iPhone in the File menu takes a photo with a nearby iPhone or iPad and adds it while the canvas has focus.
Context menu
An object's context menu offers:
| Group | Commands |
|---|---|
| Content | Edit Text, Replace Screenshot… or Replace Picture… |
| Clipboard | Cut, Copy, Paste, Duplicate |
| Style | Copy Style, Paste Style |
| Order | Bring Forward, Send Backward, Bring to Front, Send to Back |
| Object | Lock or Unlock, Delete |
On empty space it offers Select All, Add Text, Add Rectangle, Add Circle, and Add Screenshot….
Notes on the canvas
- A note counts empty image areas with Choose Screenshots…, then missing texts with Add Texts.
- Translation missing: a dashed orange marker. Double-click to type the translation.
- The status line names missing prerequisites, such as Select an object first. It stays while the pointer rests on it.
Images and layers in the sidebar
The sidebar shows the Set and Format menu, the Images list, and the Layers list. You can drag its width; ⌃⌘S hides it.
- Set and Format lists each set with its formats, A/B Test…, and Manage Sets….
- Images shows thumbnails with number and name. Dragging screenshots onto a thumbnail adds them to its image area.
- Layers shows the frontmost object first, with an icon per kind and a title from the text. Each row has a lock. Multiple selection works, dragging changes the stacking order, ⌫ deletes.
- Across Images is a separate section for panorama objects. With no objects, it says No Objects.
Where a change applies
At the top of the inspector, Changes apply to sets the scope of a change. The more specific level wins.
| Level | Applies to |
|---|---|
| Shared Layout | all formats and languages |
| This Device Format | this format only, in all languages |
| This Language | this language only, in all formats |
| This Output Only | exactly this format in this language |
If an object has its own values at the chosen level, Reset to Shared Layout appears and removes them.
Style text
Select a text; the inspector then shows Content, Style, Fit, and Colors.
Text styles and fonts
Nine text styles set several values with one click: Headline, Display, Elegant, Label, Overline, Quote, Friendly, Technical, and Body.
Font offers 16 fonts: SF Pro, SF Pro Rounded, New York, SF Mono, Helvetica Neue, Avenir Next, Futura, Gill Sans, Optima, Georgia, Baskerville, Didot, Palatino, American Typewriter, Helvetica, and Menlo. The app hides fonts that aren't installed.
| Field | Effect |
|---|---|
| Size | Font size in pixels |
| Weight | Six weights from light to heavy |
| Alignment | Align Left, Center, Align Right |
| Tracking | −20 to 100 % |
| Line Height | 50 to 300 % |
| All Caps, Italic | Switches |
Accent words and marker
Words between *asterisks* appear in their own color. The row Accent Words under Colors sets it. Accent words change only the color, not the size. A Marker puts a colored area with padding and rounded corners behind the text.
When text doesn't fit
Shrink to Fit under Fit reduces the font to as little as 60 % when a text or translation doesn't fit.
Apply a style across the set
Apply to All Headlines matches every headline in the set. The same exists for Subtitles, Labels, Card Titles, Quotes, Attributions, Bullets, and Footers. Contents and locked objects stay untouched.
Use Show Without Text when a text should stay empty in a language on purpose.
Spelling
The text editor checks spelling and grammar through the system. Edit → Spelling and Grammar contains Show Spelling and Grammar (⌘:), Check Text Now (⌘;), and Check Spelling While Typing. The export check also lists possible typos as notes.
Text suggestions with Apple Intelligence
Suggestions… writes five versions of the selected text on your Mac. You need Pro and a Mac with Apple Intelligence turned on.
- Select a text and click Suggestions… in the inspector.
- Under Tone, choose Clear, Friendly, Bold, or Brief.
- If needed, describe your app under About the App and the image under This Image. Pitching Set remembers the app description per app.
- Click Suggest. Suggestions appear one after another.
- Click a suggestion to see it in the preview.
- Click Use or double-click it.
The text is written in the language of the output shown. The form of address carries over, and accent words get marked to fit. New Suggestions writes more.
All Headlines in the Set… offers up to ten connected headlines to tick. Rewrite writes them again; applying them is one undo step.
Word limits per kind of text: headline 5, subtitle 12, overline 3 words, and 4 and 7 with the tone Brief.
If it doesn't work, the app gives the reason: This Mac Can’t Write Suggestions, Apple Intelligence Is Off, The Language Model Is Still Downloading, or This Language Isn’t Available Yet. Open System Settings takes you to the setting.
Add pictures and screenshots
You add images by dropping, pasting, or with Screenshot…. PNG, JPEG, and HEIC work, up to 80 MB, 16,000 pixels per side, and 100 megapixels. The app reads them in the background and checks them before decoding. It reuses identical images.
When dropping, the target is first the object under the pointer, then the selection, then an empty image area, otherwise a new screenshot. A device keeps its frame. Image data without a file, such as from Photos or a browser, can also be dropped.
In templates with card or magnifier cut-outs, the matching detail areas fill in the same step.
Assign many screenshots at once
Dropping several files opens Assign Screenshots.
- For each file, check the preview, pixel size, and matching formats.
- Choose the target as an image and object, or Don’t Import.
- Click Apply Assignment.
Crop and image area
In the inspector under Picture, choose Replace Screenshot… or Replace Picture…, and under Image Area the mode Fit or Fill. Crop offers Scale from 1 to 2000 %, plus X and Y.
Clean up the status bar (9:41)
Clean Up Status Bar (9:41) sets 9:41 and full indicators for battery, Wi-Fi, and signal on portrait iPhone screenshots.
The app detects the existing status bar and keeps its position and color. It creates a copy “… 9.41.png”, and the original stays. This applies to all objects on the image that use this picture.
Import captures from a folder
Import Captures in the toolbar watches a folder, for example for Simulator screenshots.
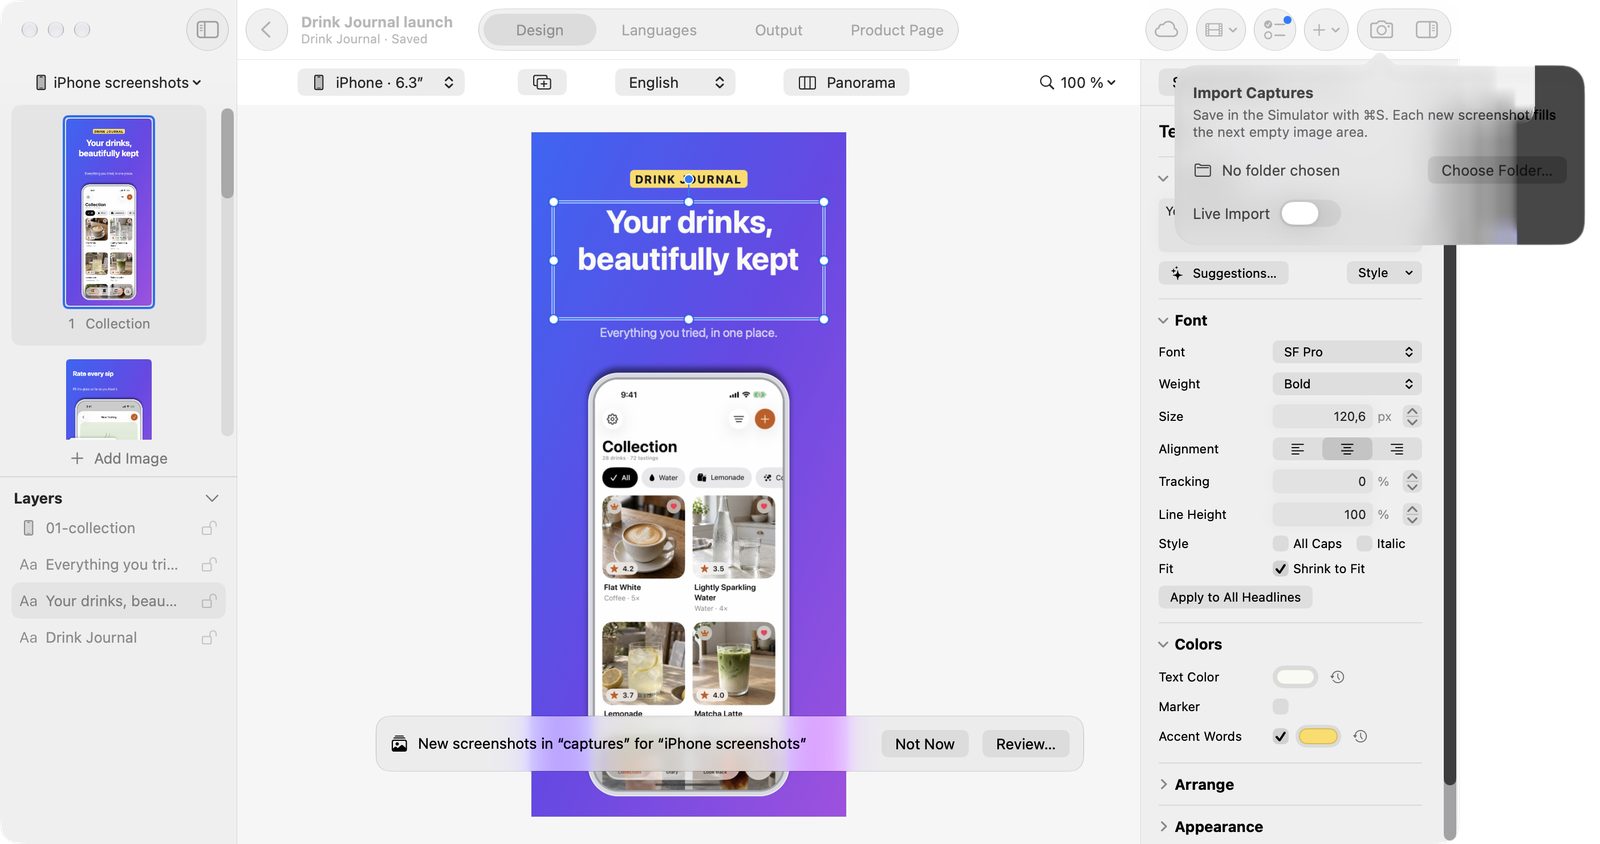
- Click Import Captures.
- Click Choose Folder…. The Desktop is suggested; your choice is remembered.
- Turn on Live Import.
- Each new PNG, JPG, or HEIC fills the next empty image area. Occupied areas stay.
- Stop in the status line ends the import.
Videos in the folder lead to a note about the app preview.
Add a device frame to a screenshot
Pitching Set draws its own device bodies and, on request, downloads real Apple frames. To add a device frame to a screenshot, select the screenshot and open Device in the inspector.
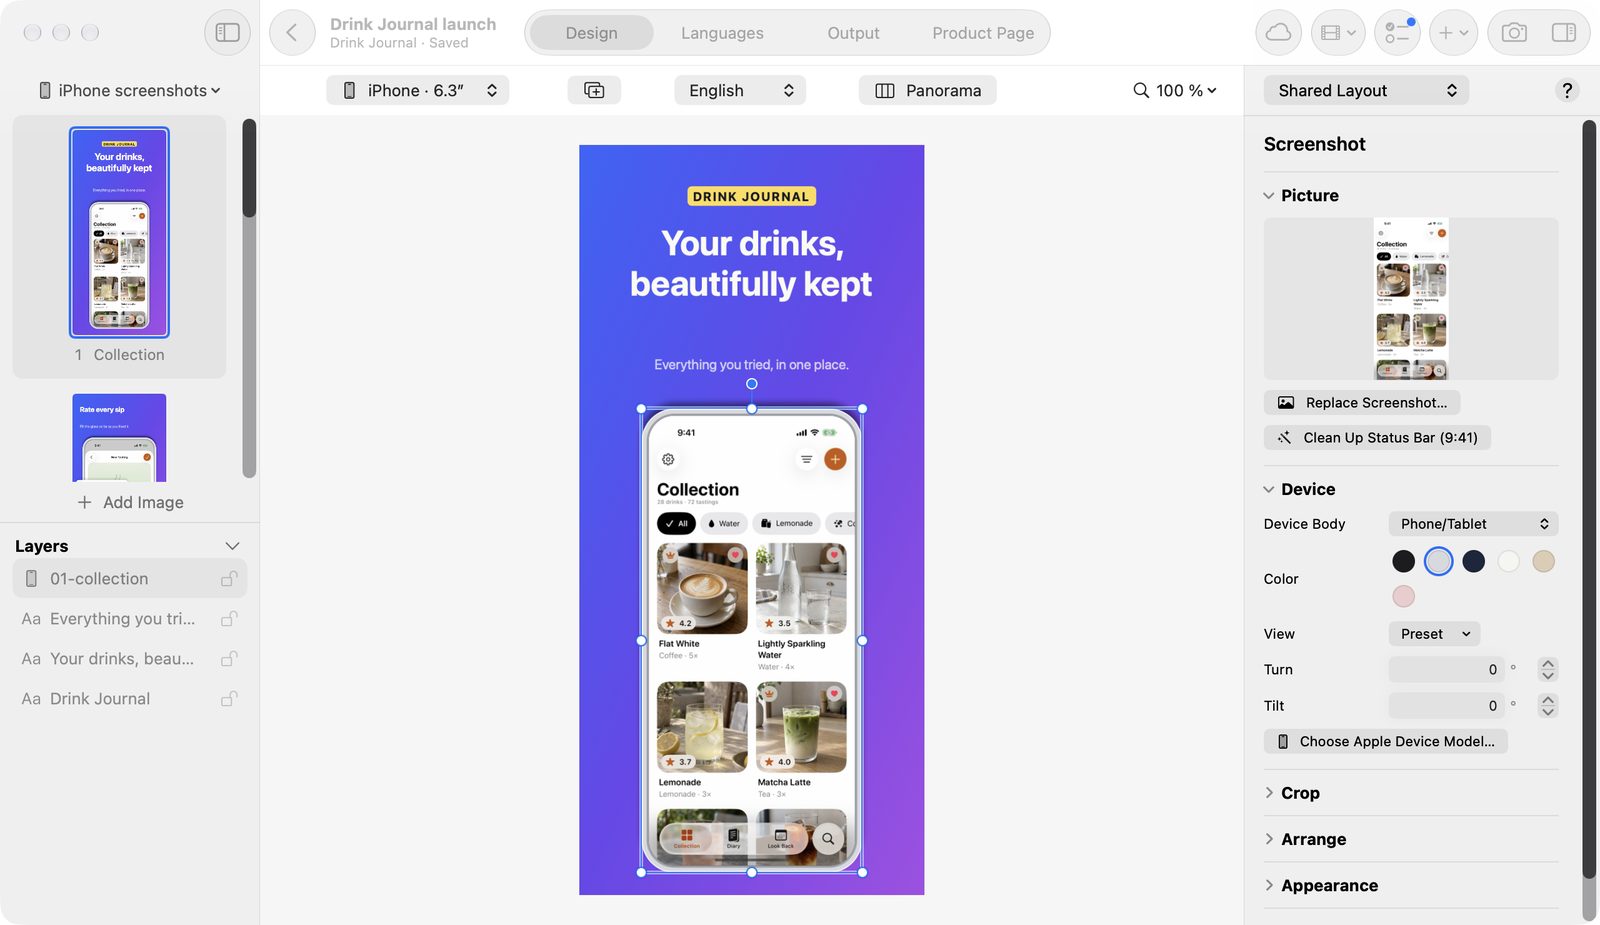
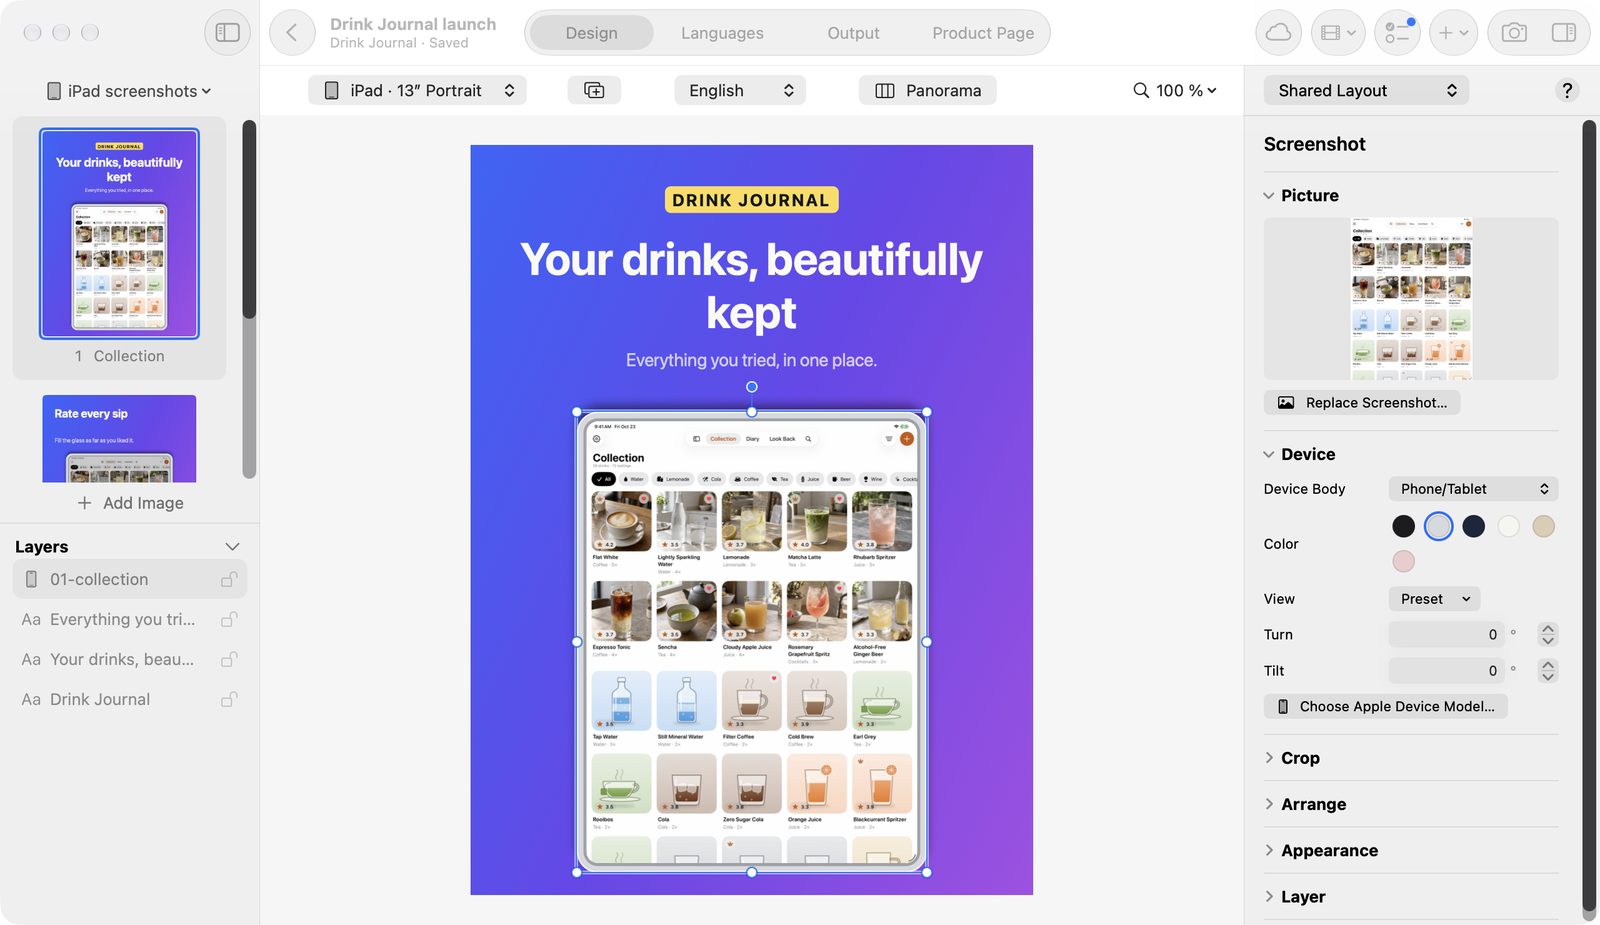
Drawn device bodies
Device Body Shape offers No Device Body, phone or tablet (adapts to the screenshot), notebook with or without a notch and with a keyboard, and smartwatch.
| Shape | Finishes |
|---|---|
| Phone, tablet, smartwatch | Graphite, Silver, Night Blue, White, Sand, Rosé |
| Notebook | Deep Black, Silver, Night Blue, Champagne, Light Blue, Rosé, Lime, Ink Blue |
When you change shape, the finish stays if it exists for the new shape. For other stores and promo videos, the app always uses its own device body.
Apple original frames
The app includes no Apple frames. It downloads them from Apple at your request, and you agree to Apple's license yourself. Read the license before you agree.
- Click Choose Apple Device Model…. The Device Frames window opens.
- Under Real Device Models from Apple, click Get next to the package you want. The app checks free space first and shows progress. You can cancel and try again.
- macOS shows Apple's license. Agree yourself. The app never confirms it for you; without your agreement, the process stops after 10 minutes.
- Review the frames and add them.
- Choose a model and click Use or For All in Set.
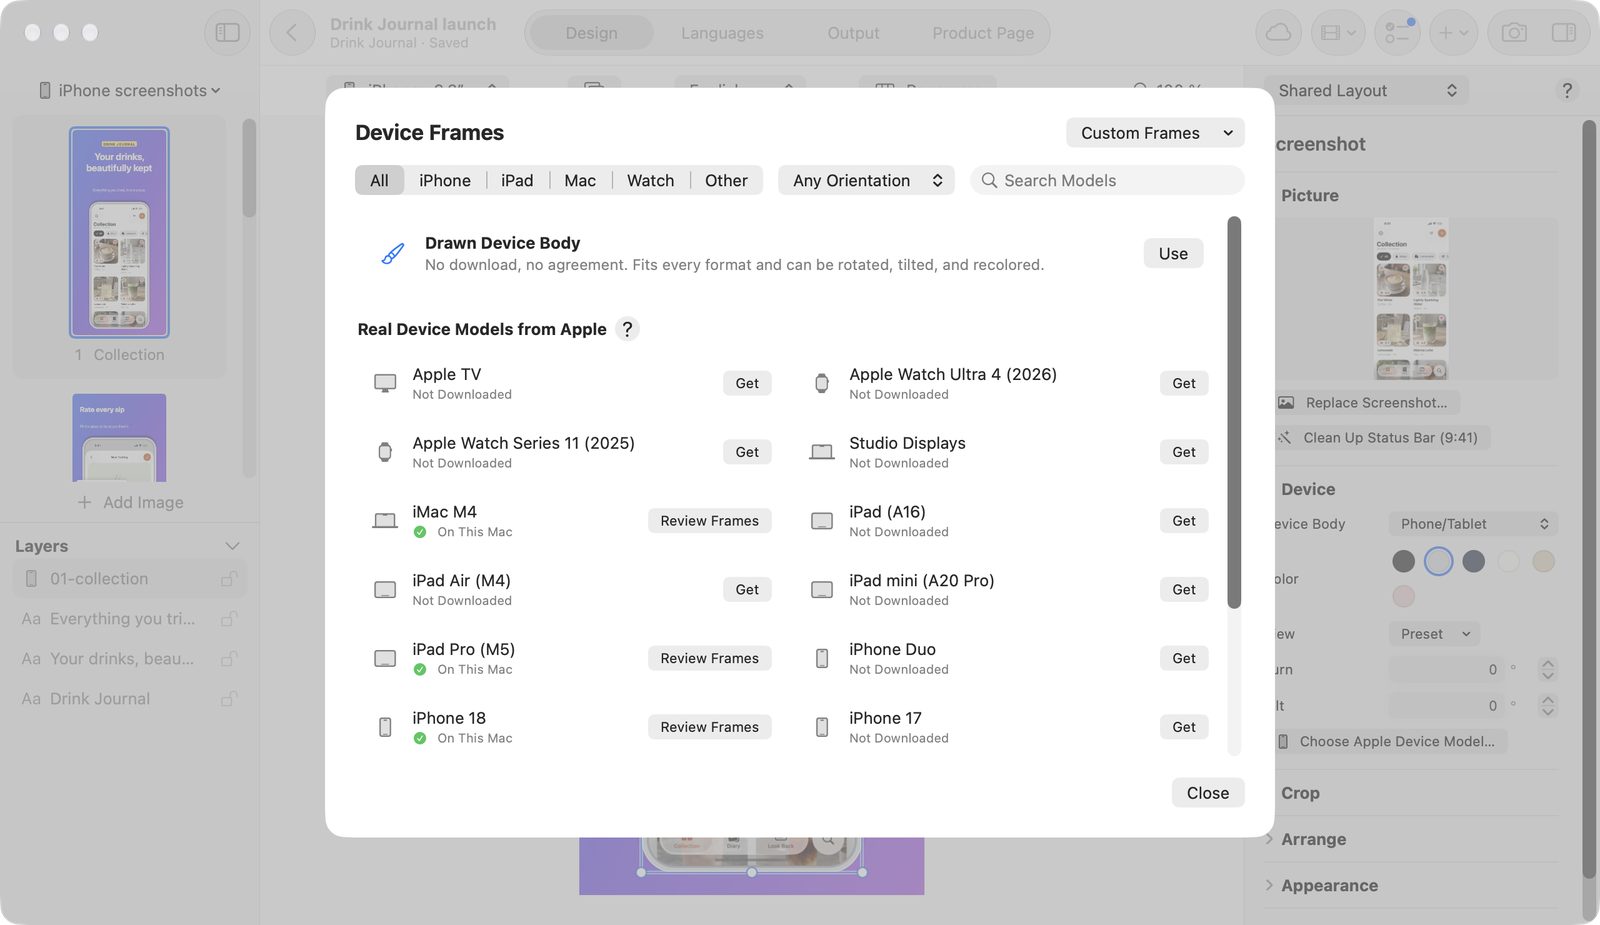
The window filters by Family (iPhone, iPad, Mac, Watch, Other), orientation (Any Orientation, Portrait, Landscape), and Search Models. Fits marks a matching aspect ratio. The library holds up to 400 frames.
Other ways:
- Open Apple Design Resources goes to Apple's page.
- Add an already downloaded package from a folder takes a package you already have.
- Add Folder… reads up to 200 PNG files, including one level of subfolders. Review Found Frames shows Already in the library and Select All Matching.
- Add Single PNG… opens Check Screen Area. The area is detected and can be adjusted by dragging or at its four corners, and with numbers under Refine Area. A transparent PNG up to 40 MB, 8000 pixels, and 24 megapixels works.
The screenshot is cut into the screen opening with a mask taken from the transparency.
Rules for Apple frames
Original frames are never rotated, tilted, animated, shadowed, blurred, or cropped. The controls are dimmed, and the frame is marked Stays as Apple made it. Text or graphics on an original frame produce a warning; Apple's marketing guidelines allow them beside the device, not on it. The window explains this under Why can’t they be tilted? and Why do I need to agree myself?.
If an original frame is distorted or cut off at the edge, the app straightens it on opening, when you switch to Output or App Store Connect, and through Fix. ⌘Z reverses it.
If the frame file is missing, such as on another Mac, the canvas shows Locate frame. The inspector offers Locate File…, Choose Model…, and Without Device Frame.
Apple decides in the end what's allowed. The app doesn't replace legal advice.
3D perspective
3D exists only for the drawn phone and tablet body, never for Apple frames. Under Perspective, choose View: Straight, Left Side Forward, Right Side Forward, or Top Tipped Back. Turn and Tilt go up to ±35°. Shadow and opacity apply after the projection.
Background and palettes
Click an empty spot on the canvas; the inspector then shows the image, including its App Store screenshot background.
- Design Palette offers 27 palettes, see Templates. A click applies a palette to the image, or to the whole set in the Panorama view.
- Create Palette makes your own: From This Image’s Screenshot, From App Icon or Image…, or Save Current Gradient…. You can have up to 24 per Mac. Delete Palette… removes one.
- Adjust Gradient sets linear or radial, with Angle or Center X and Center Y. Color stops have a position, up to 16 with Add Color and Remove Color. Solid Color makes the gradient one color.
- Background and Second Color set colors directly.
- Image Details contains Image Name.
Copy style, find and replace, arrange
Copy Style (⌥⌘C) and Paste Style (⌥⌘V) use their own clipboard, so the normal one stays untouched. Text values go only to texts; fill and corners only to shapes.
Find and Replace… (⌘F) changes texts in all images of the set.
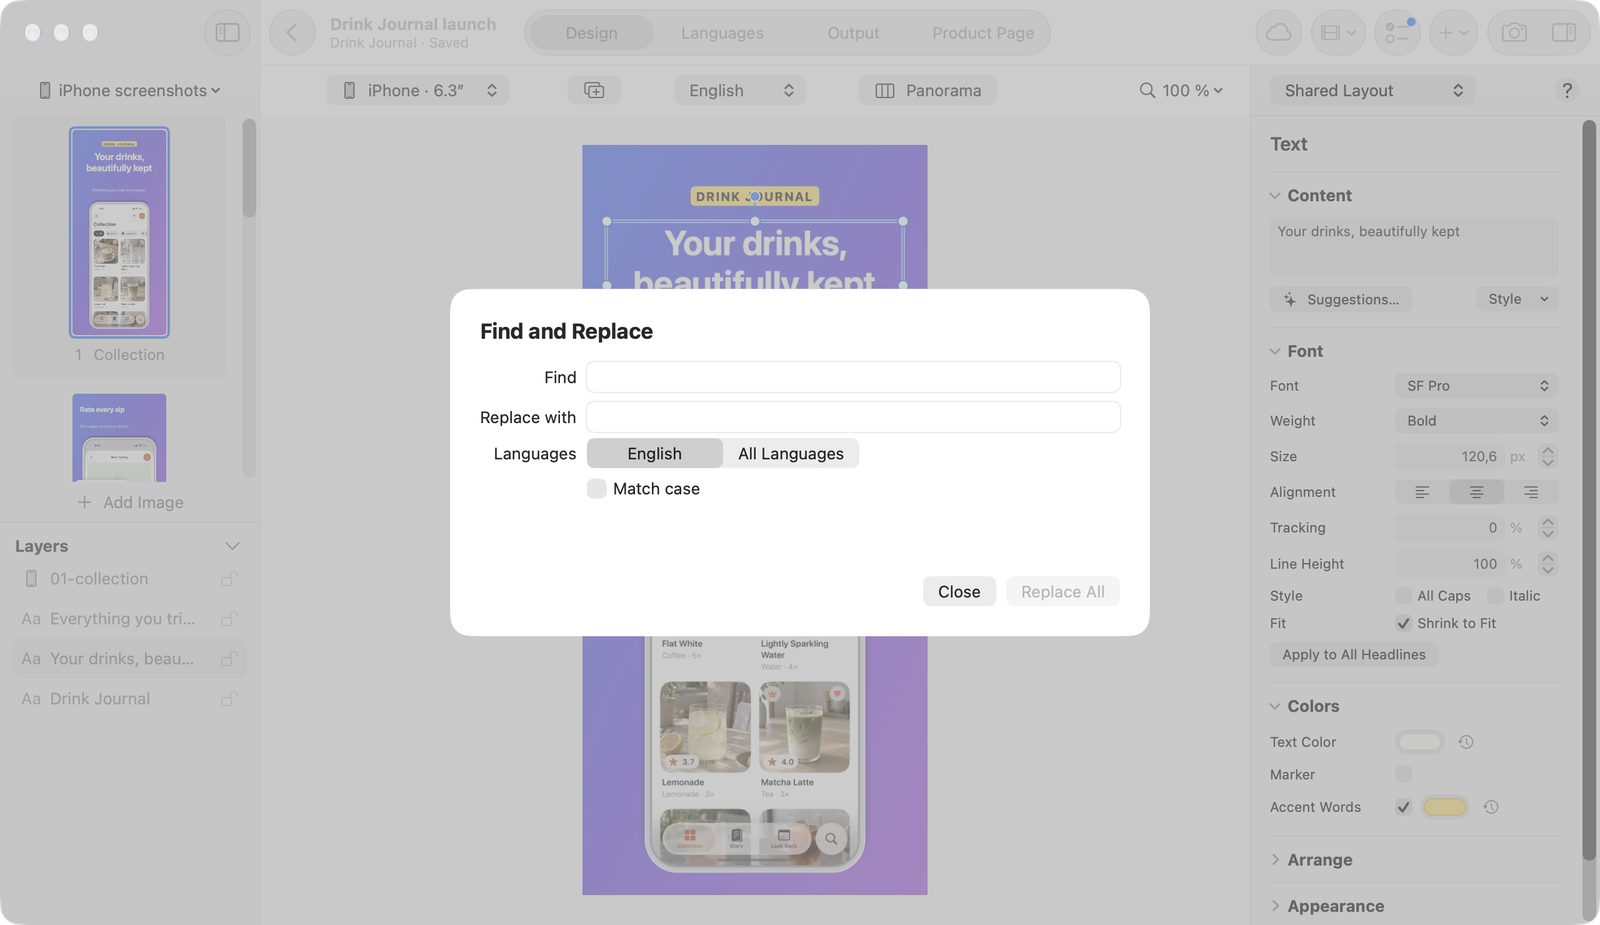
- Press ⌘F.
- Enter Find and Replace with. The match count updates as you type.
- If needed, choose All Languages and Match case.
- Click Replace All. That's one undo step. Locked texts stay; the app names them separately.
The Arrange menu contains:
| Command | Shortcut |
|---|---|
| Bring Forward | ⌘] |
| Send Backward | ⌘[ |
| Bring to Front | ⇧⌘] |
| Send to Back | ⇧⌘[ |
| Center Horizontally | – |
| Center Vertically | – |
| Lock or Unlock | ⌘L |
| Next Image | ⌥⌘↓ |
| Previous Image | ⌥⌘↑ |
| Add Image | ⌥⌘N |
Inspector
The Inspector on the right shows the values of the selection or, with nothing selected, of the image.
| Section | Fields |
|---|---|
| Arrange | Center, X, Y, Width, Height, Rotation |
| Appearance | Opacity, Shadow, Blur |
| Layer | Name, Locked |
| Shape | Fill Color, Corner Radius, Recent Colors |
| Picture | Screenshot, Image Area, Crop, Clean Up Status Bar (9:41) |
| Image | Background, Design Palette, Image Details |
Sections collapse. Number fields have a unit and limits and accept both decimal separators. You can also change them with ↑ and ↓, in steps of ten with ⇧. Esc discards the entry.
With several objects selected, Align offers Align Left, Align Right, Align Top, Align Bottom, Distribute Horizontally, and Distribute Vertically. Shared values under Size and Position change all selected objects. Mixed marks values that differ.
Fix in Output jumps to the object, opens the inspector at the right level, and highlights the property.
Undo
Every action is a named undo step. ⌘Z takes it back, ⇧⌘Z restores it. While typing, the text field's own undo applies.
Free and Pro
The whole editor is free, including for formats and languages you can only export with Pro. That covers drawn device bodies, 3D perspective, Apple frames, palettes, Find and Replace, and the spelling check.
Suggestions… and templates with the PRO badge need Pro. You can design images of Pro outputs for free, but not copy them as an image or drag them out.